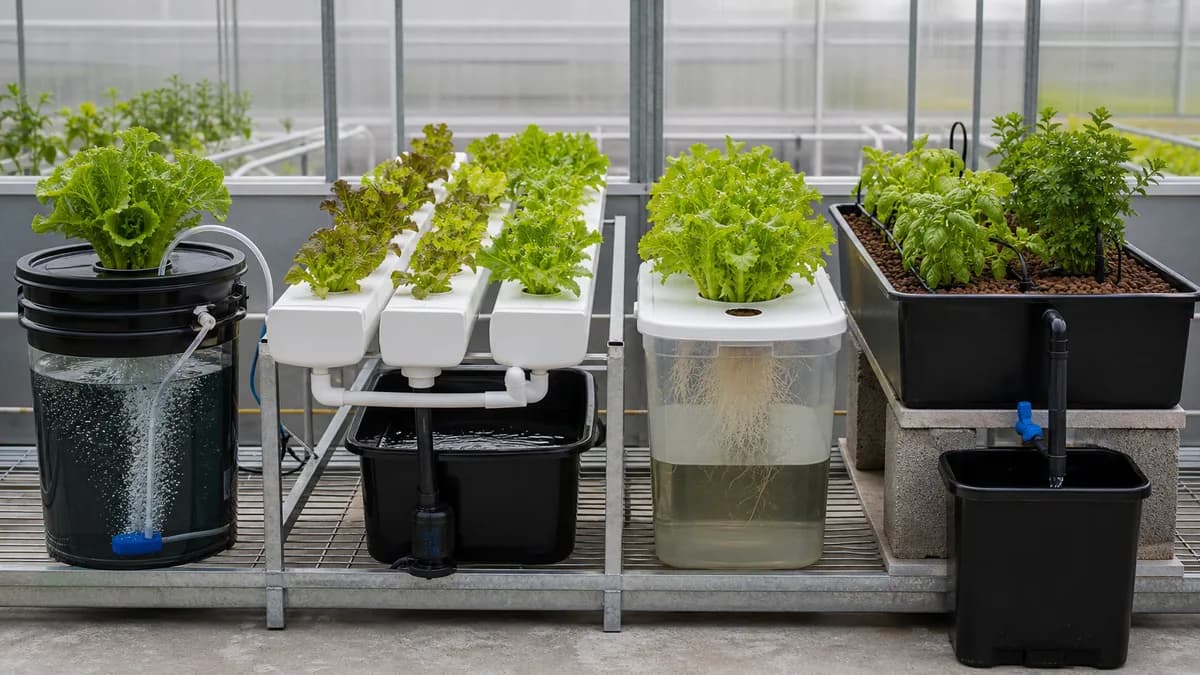
Sistemas hidropónicos: planifique para su espacio
Elija un sistema hidropónico que se adapte al cultivo, el espacio disponible y las necesidades de energía, agua, mantenimiento, acceso y ampliación.
Elija un sistema hidropónico que se adapte al cultivo teniendo en cuenta el espacio que ocupará cuando madure, la sujeción de las raíces, las necesidades de energía y agua, la rutina de mantenimiento, los requisitos de acceso y el margen de ampliación. DWC, NFT, Kratky y el flujo y reflujo pueden funcionar, pero cada método impone distintas exigencias al cultivador y a la zona de cultivo.
Ningún método gana en todas las comparaciones. Los ensayos con lechuga han favorecido DWC en un entorno, NFT en otro y ambos sistemas en estaciones distintas. Una investigación sobre albahaca determinó que la elección del cultivar tenía más importancia que la diferencia entre el cultivo de flujo profundo y NFT. Estos resultados apuntan a una regla de planificación útil: elija primero en función de su cultivo y sus condiciones de funcionamiento, antes de comparar productos.
Esta guía le ayuda a tomar esa decisión. Abarca las principales cuestiones de planificación y enlaza con guías detalladas de cada método, donde se tratan la construcción, los ajustes de funcionamiento y la resolución de problemas.
Índice
- Elija un sistema hidropónico para su espacio
- Compare los sistemas por cultivo y mantenimiento
- Planifique la superficie, el acceso, la energía y el agua
- Pase a la comparación y configuración de los métodos
- Pase de elegir el sistema a distribuir la sala
- Fuentes y notas de investigación
¿Necesita una comparación método por método? Lea DWC frente a NFT frente a Kratky. Si ya tiene en mente los cultivos y una sala, consulte Garden Architect antes de comprometerse con el equipamiento.
Elija un sistema hidropónico para su espacio
Un buen proceso de planificación de un sistema hidropónico parte de seis datos: arquitectura del cultivo, superficie ocupada por la copa y las raíces en la madurez, tolerancia a los cortes de energía, capacidad de supervisión, uso de recursos y planes de ampliación. Este orden mantiene la atención en lo que necesitan las plantas y las personas. También evita un error de planificación habitual: comprar un sistema por su número de posiciones sin comprobar antes si cabrán las plantas maduras.
1. Empiece por el cultivo en el momento de la cosecha
Anote qué quiere cosechar, no solo qué quiere plantar. Una bandeja de hojas tiernas, una hilera de cogollos de lechuga completos, un grupo de albahacas sometidas a cortes repetidos y un cultivo de tomate entutorado plantean exigencias distintas.
Los cultivos compactos de hoja y las hierbas aromáticas se adaptan especialmente bien a DWC y NFT. Los ensayos universitarios y las comparaciones de servicios de extensión respaldan ambos métodos para lechuga, espinaca, perejil y albahaca, aunque el método más favorable cambia según el cultivo y las condiciones. La copa madura de la planta sigue determinando cuántas posiciones se pueden utilizar.
Los cultivos de fruto de mayor tamaño necesitan más volumen para las raíces, anclaje, soporte vertical y espacio libre de trabajo. Los ensayos de Virginia Cooperative Extension determinaron que los sacos de sustrato y los cubos holandeses funcionaron mejor que NFT para tomate y pimiento en aquel programa. Este hallazgo no descarta NFT para todos los cultivos de fruto. Sí convierte los sistemas de goteo con sustrato o los cubos en una comparación más razonable antes de diseñar hileras NFT largas.
Utilice un perfil de planta para definir el cultivo antes de elegir el método. El perfil de la lechuga mantecosa, el perfil de la albahaca dulce y el perfil del tomate muestran hasta qué punto pueden diferir los puntos de partida biológicos.
2. Dibuje la copa antes que las tuberías
Marque en un plano la anchura y la altura de cada planta madura. Después añada debajo el recipiente o canal para las raíces. Las investigaciones sobre densidad de lechuga encontraron la misma contrapartida en ensayos independientes: un espaciamiento menor puede aumentar el rendimiento por unidad de superficie, a la vez que reduce la biomasa por planta. Por tanto, una tapa o un canal de 20 posiciones es una descripción del equipamiento, no una promesa de 20 plantas de tamaño completo.
Decida qué considera una cosecha satisfactoria. Si quiere cogollos completos, dimensione el plano según la anchura del cogollo maduro. Si quiere hojas tiernas, la superficie de producción puede gestionarse de otra manera. Si quiere cosechar hierbas aromáticas repetidamente, deje suficiente acceso para cortar e inspeccionar las plantas sin inclinarse sobre la copa.
3. Decida qué puede detenerse durante un corte de energía
Cada método activo tiene una dependencia distinta:
| Sistema | Patrón de la zona radicular | Equipamiento activo que debe tenerse en cuenta | Principal cuestión de planificación |
|---|---|---|---|
| DWC | Las raíces permanecen en una masa de solución nutritiva | Bomba de aire; algunos diseños también hacen circular el agua | ¿Puede proporcionar una aireación fiable? |
| NFT | Una película poco profunda de solución nutritiva circula por canales | Bomba de agua y vía de retorno | ¿Puede mantener una circulación continua e inspeccionar el caudal? |
| Kratky | Las raíces utilizan una solución estática y una zona de aire húmedo | Ninguna bomba en el método pasivo básico | ¿Pueden el recipiente y el cultivo completar juntos el ciclo previsto? |
| Flujo y reflujo | El sustrato y las raíces se inundan y después drenan | Bomba de agua y temporizador | ¿Puede gestionar los tiempos, el drenaje y la humedad del sustrato? |
La aireación activa merece un lugar en el plan de DWC, no una nota tardía sobre el equipamiento. En un experimento con lechuga de 2026, Ries, Park y Meng observaron grandes cambios en la masa fresca y el diámetro de las plantas cuando aumentaron el oxígeno disuelto de la zona radicular dentro del intervalo probado en el estudio. El resultado es específico de ese cultivo y experimento, por lo que no establece un único objetivo de oxígeno para todos los sistemas DWC. Sí demuestra que la aireación puede modificar el rendimiento del cultivo.
NFT depende de la circulación porque la solución nutritiva debe continuar moviéndose por los canales. El flujo y reflujo depende de una bomba y un temporizador porque la bandeja debe inundarse y drenar. Kratky elimina esas dependencias activas, pero su diseño pasivo sigue dependiendo de conservar la disposición de la zona radicular y adaptar el depósito al cultivo.
4. Planifique el trabajo que repetirá
Los sistemas de recirculación requieren supervisar la solución, mantener la higiene y poder acceder al depósito y a la vía de retorno. Los planes de flujo y reflujo también necesitan espacio para comprobar el temporizador, la saturación del sustrato y el drenaje. Un diagrama ordenado que oculte el depósito detrás de un banco lleno puede resultar incómodo en cuanto haya que inspeccionarlo o retirarlo.
Anote una breve rutina de mantenimiento junto a la distribución:
- ¿Dónde inspeccionará las raíces y el follaje?
- ¿Cómo accederá al depósito, la bomba, el aireador, el temporizador y la tubería de retorno?
- ¿Dónde puede drenar o transportar agua sin cruzar cables eléctricos?
- ¿Qué piezas deben extraerse para limpiarlas?
- ¿Puede llegar a la fila posterior una vez que se llene la copa?
Estas preguntas no producen una puntuación de mantenimiento universal. Revelan si el sistema encaja en su propio horario y en su sala.
5. Mantenga el agua y la energía en columnas separadas
Los sistemas hidropónicos pueden utilizar el agua con eficiencia y, al mismo tiempo, soportar una carga energética mayor. Barbosa y sus colaboradores modelizaron un alto rendimiento de lechuga y una baja demanda de agua para un escenario hidropónico en Arizona, pero ese mismo escenario necesitó mucha más energía por kilogramo que la producción en campo. Dutta y sus colaboradores también determinaron que un sistema NFT activo utilizaba menos agua y producía más lechuga que su comparación con sustrato, aunque consumía bastante más energía.
La lección es limitada y útil. No convierta un resultado de ahorro de agua en una afirmación general sobre sostenibilidad. Enumere por separado el agua, la energía de bombeo y aireación, la iluminación y el control climático. La revisión de Fussy y Papenbrock llega a la misma conclusión de planificación: las ventajas relativas al terreno y al agua deben considerarse junto con las exigencias de energía, sustratos de cultivo, equipamiento y gestión.
Si va a cultivar en interior, la superficie del sistema y el plan de iluminación deben figurar en el mismo dibujo. La ciencia de los espectros de las luces LED de cultivo le ayudará a situar la copa y el espacio libre de iluminación sin tratar la elección de la luz como una etiqueta del sistema.
6. Elija un patrón de ampliación
Un solo recipiente Kratky o cubo DWC constituye un ensayo piloto manejable para un número pequeño de plantas. Repetir esos recipientes añade más volúmenes de agua individuales que inspeccionar. Los canales NFT y los bancos de flujo y reflujo pueden compartir depósitos y equipamiento activo, lo que puede facilitar la ampliación por hileras o bancos, pero el equipamiento compartido también se convierte en una dependencia común.
Planifique el primer cultivo como una prueba de acceso, adaptación de las plantas y rutina. Virginia Cooperative Extension recomienda comenzar con una pequeña instalación de prueba antes de ampliar. Un ensayo piloto permite detectar pasillos bloqueados, plantas sombreadas, accesos incómodos al depósito y problemas de drenaje antes de repetirlos por una sala más grande.
Utilice este selector inicial:
| Su principal limitación | Empiece considerando | Por qué merece estar en la preselección |
|---|---|---|
| Unas pocas plantas de hoja y ciclo corto, equipamiento mínimo y ninguna toma eléctrica fiable | Kratky | El método básico no necesita bomba ni energía eléctrica |
| Cultivos compactos de hoja, una pequeña instalación activa y suministro de aire fiable | DWC | Una masa de agua permite una disposición compacta, siempre que la aireación se considere esencial |
| Hileras repetidas de hortalizas de hoja o hierbas aromáticas compactas y circulación fiable | NFT | Los canales y un depósito compartido son adecuados para repetir plantaciones lineales |
| Recipientes llenos de sustrato, recipientes de distintas formas o un banco de inundación existente | Flujo y reflujo | La bandeja de inundación funciona con varios formatos de sustratos y recipientes |
| Tomates, pimientos o pepinos entutorados | Sistemas de cubos o de goteo con sustrato | Los cultivos de mayor tamaño necesitan volumen para las raíces, anclaje, altura y espacio de mantenimiento |
| Muy poca superficie de suelo | Una disposición vertical tras comprobar la luz y el acceso | Apilar puede añadir posiciones, pero la sombra y el flujo de aire pueden reducir la capacidad utilizable |
Esta tabla es una preselección, no una clasificación. Continúe con las comparaciones de espacio y métodos antes de comprar equipamiento.
¿Está planificando una sala o zona de cultivo real? Consulte Garden Architect para revisar primero la función pública. Cuando esté listo para comenzar una distribución, abra el espacio de trabajo de configuración como acción secundaria.
Compare los sistemas por cultivo y mantenimiento
El mejor sistema hidropónico para su espacio se adapta al cultivo en su tamaño maduro, deja sitio para el acceso y el equipamiento y coincide con su tolerancia al uso de bombas y a la supervisión. Kratky es adecuado para unas pocas plantas compactas; DWC, para instalaciones activas compactas; NFT, para hileras repetidas; y el flujo y reflujo, para recipientes llenos de sustrato.
La forma de la sala suele reducir las opciones antes que la superficie del suelo. Una pared larga puede ser adecuada para canales NFT. Un rincón compacto puede albergar un recipiente DWC. Una zona con forma de banco puede ser adecuada para el flujo y reflujo. Un alféizar o una estantería pequeña puede albergar uno o varios recipientes Kratky, siempre que el cultivo y las condiciones lumínicas sean apropiados.
Estantería pequeña, encimera o balcón
Para una o unas pocas plantas de hoja y ciclo corto, el método Kratky presenta la menor carga de equipamiento y energía de los cuatro sistemas aquí comparados. La investigación de Bernard Kratky sobre lechuga demostró la producción sin circulación, bombas ni energía eléctrica, y trabajos independientes posteriores determinaron que el método era adecuado para la lechuga en más de una estación.
Pasivo no significa exento de parámetros. El recipiente debe satisfacer la demanda de agua del cultivo y el sistema radicular necesita la zona de aire húmedo propia del método a medida que cambia el nivel de la solución. La mejor concentración de nutrientes también varió según la estación en el ensayo con lechuga de Silva y sus colaboradores. Consulte la preparación del recipiente, la gestión de la cámara de aire y las reglas de reposición en la guía completa del método Kratky.
Un recipiente DWC pequeño es la alternativa activa cuando se dispone de un suministro de aire fiable. Mantiene las raíces en una masa de agua mayor y utiliza aireación activa. Esto lo convierte en una opción de funcionamiento distinta de Kratky, aunque ambos sistemas parezcan consistir en una planta sostenida sobre un recipiente.
Pared larga y estrecha o hileras repetidas
NFT organiza plantas compactas en canales abastecidos por un depósito compartido. Esta estructura lineal puede adaptarse bien a una pared o un banco y repetirse en varias hileras. Es una opción sólida para hortalizas de hoja y hierbas aromáticas compactas cuando se puede mantener la circulación e inspeccionar las raíces y los retornos.
La longitud y la pendiente del canal, el caudal, el dimensionamiento de la bomba y el diseño del colector determinan si una instalación NFT concreta funciona. Estos detalles de ingeniería quedan fuera de una guía principal de selección de sistemas. Utilice la guía de hidroponía NFT una vez tomada la decisión relativa a la sala.
No fuerce un cultivo de fruto grande en NFT para aprovechar una pared estrecha. Las raíces más grandes, el soporte del cultivo y el espacio libre para mantenimiento pueden eliminar la aparente ventaja espacial. La comparación de Virginia Tech determinó que los sacos de sustrato y los cubos holandeses se adaptaban mejor al tomate y al pimiento en sus ensayos.
Banco, bandeja o recipientes variados
El flujo y reflujo resulta atractivo cuando el espacio disponible ya se parece a un banco o cuando se prefieren recipientes llenos de sustrato en lugar de canales de raíz desnuda. Oregon State University Extension describe el sistema en torno a una bandeja de inundación, un depósito, una bomba y un temporizador. La bandeja se inunda y drena conforme a un programa, de modo que las raíces reciben solución nutritiva y después aire cuando la solución regresa.
La flexibilidad de los recipientes y los sustratos de cultivo puede importar más que una pequeña diferencia en el rendimiento de un ensayo. Doty, Dickson y Evans desarrollaron un sistema poco profundo de flujo y reflujo con áridos para explotaciones que ya disponían de bancos para plantas de parterre. Su contexto de decisión también resulta útil para la planificación doméstica: el equipamiento y el espacio que ya posee pueden cambiar qué método encaja mejor.
Sala vertical
Vertical describe la disposición de los niveles de cultivo, no un único método de zona radicular. Un canal NFT, un recipiente con sustrato u otro sistema de suministro de agua pueden disponerse verticalmente. La distribución puede aumentar el número de plantas dentro de una superficie de suelo reducida, pero las plantas superiores pueden sombrear a las inferiores y el follaje apilado con poca separación puede restringir el flujo de aire.
Añada la iluminación de cada nivel antes de contar las posiciones. Dibuje el espacio libre de las luminarias, la altura de las plantas y una vía para el aire y la inspección. La capacidad utilizable es el número de plantas que puede alcanzar la cosecha prevista, no el número de aberturas que caben en una torre o estantería.
Una sala para cultivos de fruto
Los tomates, pimientos y pepinos requieren un dibujo distinto al de la lechuga. Añada la copa madura, el recipiente para las raíces, el emparrado, la altura de trabajo y una vía para la poda y la cosecha. Después compare los sistemas de cubos o de goteo con sustrato con los cuatro métodos aquí tratados.
El perfil de la planta de tomate puede ayudarle a definir el cultivo antes de elegir el equipamiento. Si el plan no puede proporcionar soporte y acceso cuando la planta alcance su tamaño maduro, cambiar el método hidropónico no resolverá la incompatibilidad espacial.
Si las contrapartidas entre métodos siguen sin estar claras, lea la comparación entre DWC, NFT y Kratky. Para tomar una decisión relativa a la sala, consulte Garden Architect.
Planifique la superficie, el acceso, la energía y el agua
Un sistema hidropónico necesita espacio suficiente para la copa madura de las plantas, el espaciamiento final, el equipamiento de la zona radicular, el depósito, las bombas o el aireador, el espacio libre de iluminación, el flujo de aire y el acceso manual. Los cultivos de fruto también necesitan soporte y espacio para la cosecha. Calcule estas zonas por separado; el número de posiciones de un sistema no permite conocer su superficie operativa.
No existe una cifra de superficie universal y rigurosa para «un sistema hidropónico». Un único recipiente con lechuga y una sala de tomates entutorados son ambos hidropónicos, pero sus superficies biológicas y de mantenimiento son distintas. Incluso en la lechuga, un espaciamiento menor puede aumentar el rendimiento por superficie y reducir a la vez la biomasa de cada planta.
Utilice este método de siete pasos.
Paso 1: Elija el cultivo y la forma de cosecha
Defina si el cultivo se cosechará como hojas tiernas, un cogollo completo, una hierba aromática compacta, tallos sometidos a cortes repetidos o una planta de fruto entutorada. Esta elección determina qué significa el tamaño maduro. Si tiene previsto mezclar cultivos, calcule cada copa por separado.
Utilice orientaciones específicas para cada cultivo, no una tabla universal de espaciamiento hidropónico. Empiece por el perfil de la lechuga mantecosa, la albahaca dulce o el tomate cuando uno de estos cultivos figure en el plan.
Paso 2: Dibuje cada copa con su espaciamiento final
Multiplique la superficie de espaciamiento del cultivo maduro por el número de plantas que desea tener en el momento de la cosecha. No la multiplique por el número de orificios del equipamiento.
Maboko y Du Plooy determinaron que una mayor población de lechugas aumentó el rendimiento por unidad de superficie en su ensayo de invierno. Çekin y sus colaboradores también observaron que un espaciamiento menor entre lechugas aumentó el rendimiento por superficie y redujo a la vez la biomasa por planta. El producto deseado importa: muchas plantas más pequeñas y menos plantas de tamaño completo son planes distintos.
Paso 3: Añada el equipamiento de la zona radicular
Dibuje el recipiente, el lecho flotante, el canal, la bandeja o el contenedor debajo de la copa. Después indique dónde se mueve o permanece la solución nutritiva:
- DWC necesita su masa de solución y equipamiento de aireación activa.
- NFT necesita canales, un depósito, tuberías de suministro y una vía de retorno.
- Kratky necesita un recipiente adaptado al plan del cultivo.
- El flujo y reflujo necesita una bandeja o recipientes, un depósito, una bomba, un temporizador y una vía de drenaje.
Mantenga conceptuales los espacios libres para las tuberías en esta fase. Las dimensiones detalladas de los canales, el dimensionamiento de las bombas y las profundidades de inundación corresponden a las guías de cada método.
Paso 4: Añada el espacio de mantenimiento
Dibuje el espacio que necesita una persona para inspeccionar hojas y raíces, cosechar, limpiar superficies, retirar o abrir el depósito y acceder a bombas, temporizadores y retornos. Añada una vía para introducir agua limpia y retirar el agua usada. Virginia Cooperative Extension incluye el suministro de agua, la limpieza, el almacenamiento, el movimiento de los productos y el drenaje seguro en la planificación integral de las instalaciones.
Un sistema que solo cabe mientras nadie lo toca no cabe realmente. Pruebe el plan trazando el recorrido del objeto más grande que podría ser necesario retirar. Si un depósito no puede pasar junto a la copa o por la puerta, cambie la distribución.
Paso 5: Añada altura, luz y flujo de aire
Para el cultivo en interior, apile las zonas verticales en este orden: equipamiento radicular, copa de las plantas, espacio libre de las luminarias y espacio necesario para mover el aire y mantener la iluminación. Los cultivos de fruto también necesitan altura de emparrado y acceso de trabajo.
Las estanterías verticales pueden aumentar el número de plantas sobre una superficie de suelo, pero la sombra y el flujo de aire pueden limitar lo que admite cada nivel. Revise la ciencia del espectro de las luces LED de cultivo antes de elegir las luminarias; después vuelva a la distribución y dibuje cada luz al nivel previsto de la copa.
Paso 6: Añada una vía de seguridad y limpieza
Incluya la manipulación del agua y el equipamiento eléctrico en el mismo plan, manteniendo una relación segura entre ambos. Marque adónde irían una fuga o el caudal de drenaje. Deje espacio para limpiar, enjuagar o retirar piezas sin tener que introducir las manos entre equipos conectados.
Esta guía no prescribe distancias de seguridad eléctrica ni dimensiones de códigos de edificación. Estas dependen de la ubicación y la instalación. El objetivo de planificación es revelar los conflictos entre agua, energía y acceso con antelación suficiente para resolverlos conforme a las orientaciones locales pertinentes.
Paso 7: Realice un ensayo piloto antes de llenar la sala
Complete un ciclo de cultivo con una versión más pequeña antes de repetirla por toda la superficie prevista. El ensayo piloto debe comprobar si las plantas alcanzan la copa esperada, si las posiciones posteriores siguen siendo accesibles, si los niveles inferiores reciben luz y aire y si el mantenimiento del depósito funciona en la práctica.
Registre la copa y el espacio de mantenimiento reales y actualice después la distribución. Una ampliación basada en el ensayo piloto operativo es más justificable que otra basada en el número de posiciones para plantas anunciado.
Una hoja de trabajo para planificar la sala
Complete una fila por cada zona física:
| Zona | Qué registrar | Comprobación previa a la compra |
|---|---|---|
| Copa del cultivo | Cultivo, forma de cosecha, espaciamiento maduro, número de plantas | ¿Puede cada planta alcanzar el tamaño de cosecha previsto? |
| Zona radicular | Recipiente DWC, canal NFT, contenedor Kratky o bandeja de flujo y reflujo | ¿Se adapta el método a las necesidades de raíces y soporte del cultivo? |
| Servicio de agua | Depósito, vía de llenado, vía de drenaje, retornos | ¿Puede inspeccionarlo, limpiarlo, llenarlo y retirarlo? |
| Equipamiento activo | Bomba, aireador, temporizador, controles | ¿Es fiable el suministro eléctrico y se puede acceder al equipamiento? |
| Luz y aire | Nivel de las luminarias, espacio libre sobre la copa, vía de flujo de aire | ¿Recibirá cada nivel luz y flujo de aire aprovechables? |
| Soporte del cultivo | Emparrado y altura de trabajo cuando sean necesarios | ¿Puede podar y cosechar sin bloquear el acceso? |
| Acceso humano | Pasillo, alcance, limpieza, movimiento de los productos | ¿Puede trabajar cuando la copa esté llena? |
La superficie operativa total es la unión de estas zonas, incluidas las áreas que se solapen de forma segura. Mida la sala solo después de completar la hoja de trabajo.
¿Está listo para convertir la hoja de trabajo en una distribución? Consulte Garden Architect. La página pública de la función es la vía principal de decisión; /setup está disponible cuando esté listo para iniciar la acción secundaria de configuración.
Pase a la comparación y configuración de los métodos
Esta guía de planificación utiliza ejemplos de métodos únicamente para reducir la preselección. Lea la comparación entre DWC, NFT y Kratky para profundizar en la decisión entre los tres métodos, la guía de Kratky para el funcionamiento del sistema pasivo y la guía de flujo y reflujo para obtener detalles sobre la construcción y el funcionamiento.
Pase de elegir el sistema a distribuir la sala
Una vez elegido el sistema, traslade su copa madura, depósito, bombas o aireador, vías de retorno, espacio libre de iluminación, drenaje y espacio de mantenimiento a un plano acotado de la sala. Utilice la guía de distribución de una sala de cultivo interior para las estanterías interiores, las zonas de equipamiento, el acceso y el flujo de aire. Utilice la guía de planificación de la distribución de un invernadero para los bancos, pasillos, zonas de riego y movimiento de los cultivos.
Consulte Garden Architect para comparar esas disposiciones físicas mediante la página pública del producto. Mantenga los enlaces específicos de cada método anteriores como fuentes principales sobre construcción, ajustes y resolución de problemas.
Última verificación:
Pon la guía en práctica
Usa Truleaf Garden Architect para planificar el espacio, el equipo y el sistema de cultivo antes de construir.