Grow Broccoli Sprouts at Home: 5-Day Sulforaphane Protocol
Grow broccoli sprouts at home for maximum sulforaphane content. Research-backed guide covering seed selection, jar sprouting protocol, harvest timing, food safety, and post-harvest techniques to boost bioactivity. Based on 15 sources from Johns Hopkins, UC ANR, FDA, and more.
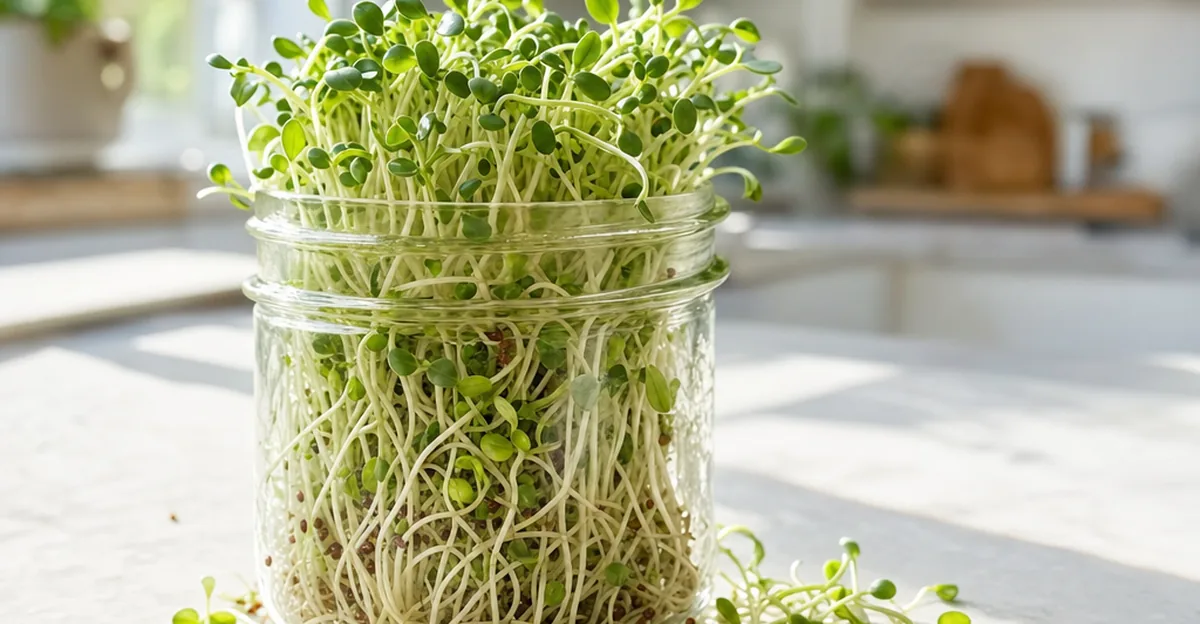
Broccoli sprouts are one of the simplest crops you can grow at home — a jar, some seeds, and water are all you need. They also happen to be one of the most nutritionally dense foods available. In 1997, researchers at Johns Hopkins University demonstrated that three-day-old broccoli sprouts contain 10 to 100 times more glucoraphanin — the precursor to the bioactive compound sulforaphane — than mature broccoli heads, gram for gram.
Since that landmark paper, sulforaphane has become one of the most studied plant-derived compounds in human nutrition, with 84 clinical trials registered on ClinicalTrials.gov as of 2025. Growing your own sprouts gives you direct control over seed quality, harvest timing, and preparation — the three factors that most influence how much sulforaphane you actually consume.
This guide covers the full process from seed to table, with every recommendation grounded in peer-reviewed research or university extension guidance. Where sources disagree, we say so explicitly.
Why Sulforaphane Matters
What It Does
Sulforaphane is an isothiocyanate — a sulfur-containing compound released when plant cells are damaged (by chewing, cutting, or blending). It activates the Keap1/Nrf2 signaling pathway, which upregulates the body's own Phase 2 detoxification enzymes, including glutathione transferases, NAD(P)H:quinone reductase, and glucuronosyltransferases. These enzymes help neutralize carcinogens and reactive oxygen species before they can damage DNA.
A 2025 systematic review by Saito et al. analyzed 84 clinical trials and identified several areas of active investigation, including cancer chemoprevention (prostate and breast), autism spectrum disorder symptoms, glycemic control in type 2 diabetes, detoxification biomarkers, and inflammatory markers. Results varied across trials, and the researchers note that approximately 50% of completed trials remain unpublished — a significant publication-bias concern that limits the strength of current conclusions.
Note: This guide is for informational purposes only and does not constitute medical or dietary advice. Consult a healthcare professional before making dietary changes for therapeutic purposes.
Why Sprouts, Not Mature Broccoli
The math is straightforward. Fahey, Zhang & Talalay (1997) measured inducer potencies of 92,500 to 769,000 units per gram fresh weight in three-day-old sprouts — concentrations 10 to 100 times higher than in mature broccoli florets. Fahey & Kensler (2021) confirmed that seeds contain approximately 100 times more glucoraphanin than mature florets, with levels diminishing as sprouts mature over 10 to 14 days.
In practical terms, Saito et al. (2025) note that approximately 200 g of broccoli sprout homogenate provides around 100 micromoles of sulforaphane. In clinical studies, doses typically ranged from 100 to 150 micromoles. To get the same amount from mature broccoli, you would need roughly ten to one hundred times more by weight, depending on cultivar.
What You Need
Broccoli sprouts require almost no equipment. They are a water-only, seed-reserve crop that needs no fertilizer, grow lights, or soil during their 3-5 day cycle.
Essential Equipment
- Wide-mouth mason jar (quart/liter size) with a mesh sprouting lid or cheesecloth secured by a rubber band
- Broccoli sprouting seeds — untreated, sold specifically for sprouting (not pesticide-treated garden seed)
- Clean potable water for rinsing
- A bowl or stand to prop the jar at an angle for drainage
Alternatively, a shallow draining tray works for larger batches. Standard hydroponic systems (DWC, NFT, Kratky, drip, aeroponics) are not suited for this short-cycle crop.
Seed Selection: The Most Important Decision
Not all broccoli seeds produce the same sulforaphane levels. Triska et al. (2021) documented a 30-fold difference in glucoraphanin potential between different seed batches. Fahey & Kensler (2021) additionally found glucoraphanin levels ranging from 2 to 124 micromoles per gram across cultivars — a 62-fold range.
Based on available data, seed variety appears to be the most important factor determining sulforaphane yield — the 30-fold range from seed selection dwarfs the variation reported for temperature, light, or harvest timing.
Practical advice:
- Buy seeds labeled specifically for sprouting from reputable suppliers
- Use pathogen-tested or certified seed when available
- Avoid garden-seed packets, which may be treated with fungicides that are unsafe to consume as sprouts
Step-by-Step Growing Protocol
Day 0: Soak
- Measure 2-3 tablespoons of broccoli sprouting seeds into your jar.
- Cover with several inches of lukewarm water.
- Soak for 2-4 hours (lukewarm) or overnight at room temperature.
- Drain completely through the mesh lid. Seeds will have visibly swelled — do not overfill your container, as they expand substantially during sprouting.
Days 1-4: Rinse and Drain
- Rinse every 4-8 hours with clean, cool water. UC ANR recommends every 4-6 hours during the early phase to flush CO2 and metabolic waste products. Virginia Tech Extension provides a broader range of every 6-12 hours.
- Drain the jar completely after each rinse. Prop it upside down at a slight angle so water drains out and air circulates in. Complete drainage is critical — standing water is the primary cause of mold and bacterial growth.
- Keep the jar at 21-26°C (70-79°F) for best-quality sprouts. Temperatures above 26°C produce faster but more elongated growth.
- Store in a dimly lit or dark location during this phase. Complete darkness is fine for germination — light is not required.
Day 4-5: Optional Greening
On the final day before harvest, you may move the jar to indirect light to develop green cotyledons. This is where sources present different perspectives:
- Zhang et al. (2020) found that LED light at 60 micromoles per square meter per second with a 12-hour photoperiod enhanced chlorophyll content and visual quality of sprouts.
- Oliveira et al. (2015), studying Brassica oleracea sprouts, found that complete darkness was beneficial to overall nutritional quality.
- UC ANR notes that light is optional and greening is a cosmetic choice, not a nutritional requirement.
The trade-off: Light exposure on the final day improves the sprouts' green color and appearance. Dark-grown sprouts (classic pale/yellow etiolated sprouts) may retain higher overall nutritional density, according to Oliveira et al.. Both approaches produce sprouts with high glucoraphanin content. Choose based on your preference for appearance versus maximizing nutritional compounds.
Day 5: Harvest
Harvest when sprouts are 3-5 cm (1-2 inches) tall with small cotyledon leaves, and most seed coats rinse away freely.
Why day 5? Tian et al. (2017) measured sulforaphane content across the growth cycle and found the highest concentration at day 5: 233.80 micrograms per gram dry weight (~1.32 µmol/g DW). Content increased from day 3 to day 5, then decreased in older sprouts. Note: absolute sulforaphane concentrations vary widely between studies due to differences in cultivar, extraction method, and analytical technique — the day-5 peak timing, not the absolute value, is the consistent finding. Le et al. (2019) independently selected five-day-old sprouts for maximum bioactivity after comparing germination times from 3 to 12 days. This aligns with UC ANR's recommended 4-5 day harvest window.
Fahey's 1997 landmark study used three-day-old sprouts, which represent the peak glucoraphanin (precursor) concentration. The distinction matters: day 3 sprouts have the most precursor, while day 5 sprouts contain the most converted sulforaphane.
Maximizing Sulforaphane After Harvest
Growing the sprouts is half the equation. How you handle them after harvest significantly affects how much sulforaphane your body actually receives.
Activate the Myrosinase Enzyme
Sulforaphane does not exist in the intact plant. The precursor glucoraphanin converts to sulforaphane only when the enzyme myrosinase comes into contact with it — which happens when cell walls are broken. This means:
- Chew thoroughly or blend raw sprouts to maximize conversion
- If you freeze or cook sprouts (which inactivates myrosinase), add a pinch of mustard seed powder as an external myrosinase source to rescue the conversion
The Blanching Technique (Advanced)
Mahn et al. (2022) demonstrated a counterintuitive finding: briefly blanching sprouts at 61°C for approximately 5 minutes increased sulforaphane content by 3.3 times compared to untreated sprouts — yielding approximately 54.3 micromoles of sulforaphane per gram dry weight, the highest concentration reported for any post-harvest treatment.
The mechanism: moderate heat inactivates the epithiospecifier protein (ESP), which normally diverts a portion of glucoraphanin toward a less beneficial breakdown product, while preserving enough myrosinase activity to continue converting glucoraphanin to sulforaphane.
This technique requires precise temperature control (a kitchen thermometer and water bath). It is not essential for home growers who consume sprouts raw, but it represents a meaningful increase for those pursuing maximum sulforaphane intake. Note that this finding comes from a single study and has not yet been independently replicated — results may vary across cultivars and conditions.
Storage
Store harvested sprouts at 4°C (40°F) — standard refrigerator temperature — and consume within 4-6 days. Tian et al. (2017) found that refrigeration preserves enzymatic activity, while room-temperature storage degrades potency.
Sulforaphane Optimization Protocol
The amount of sulforaphane you actually absorb depends on how you handle sprouts after harvest. Each preparation method activates or preserves different amounts of the myrosinase enzyme and its substrate glucoraphanin. Here is a ranked comparison of documented techniques.
Method Comparison
| Method | Sulforaphane Yield | Mechanism | Source |
|---|---|---|---|
| 61°C blanch (~5 min) | ~54.3 µmol/g DW (3.3× vs. untreated control) | Inactivates ESP while preserving myrosinase | Mahn 2022 |
| Raw, thoroughly chewed | Baseline (full myrosinase contact) | Mechanical cell rupture releases myrosinase | Fahey 2021 |
| Blended/homogenized | Comparable to chewing; more complete cell rupture | Mechanical disruption of all cells | Fahey 2021 |
| Frozen, thawed + mustard powder | Partial recovery | External myrosinase from mustard rescues conversion | Triska 2021 |
| Cooked >70°C without mustard | Minimal | Myrosinase fully denatured; no conversion | Mahn 2022 |
Note: Yield values come from different studies using different cultivars, growing conditions, and analytical methods. Absolute values across rows are not directly comparable — the relative ranking of methods is the meaningful takeaway.
Precision Blanching Protocol
For growers pursuing maximum sulforaphane yield, the Mahn et al. (2022) blanching technique is the most effective documented post-harvest method:
- Heat water to exactly 61°C using a kitchen thermometer or sous vide device. Precision matters — temperatures above 70°C denature myrosinase and eliminate conversion.
- Submerge harvested sprouts for approximately 5 minutes. Maintain temperature within ±2°C throughout.
- Transfer immediately to ice water to halt the thermal process.
- Consume within 30 minutes of blanching for maximum conversion, or refrigerate at 4°C.
The mechanism: the epithiospecifier protein (ESP) denatures at lower temperatures than myrosinase. By heating to 61°C, you selectively disable ESP — which normally diverts glucoraphanin toward sulforaphane nitrile, a less bioactive product — while keeping myrosinase active to convert the remaining glucoraphanin to sulforaphane.
Combining Techniques for Maximum Yield
For the highest practical sulforaphane intake, combine these evidence-based steps:
- Select high-glucoraphanin seed — this single factor accounts for up to a 30-fold difference in potential.
- Harvest at day 5 for peak converted sulforaphane content.
- Blanch at 61°C for ~5 minutes to eliminate ESP competition.
- Blend or chew thoroughly after blanching to ensure complete cell rupture and myrosinase contact.
- Consume promptly — refrigerate at 4°C if not eating immediately.
Food Safety: Read This Before You Start
Raw sprouts carry an inherent food safety risk that distinguishes them from most other home-grown foods. The warm, humid conditions that sprouts need to germinate are also ideal for bacterial growth when contamination is present.
The Risk in Context
The FDA classifies sprouts as a distinct food-safety risk category. CDC data compiled by Virginia Tech documented 14 sprout-related outbreaks between 2006 and 2019, resulting in 504 illnesses, 118 hospitalizations, and 2 deaths. Approximately 70% of these outbreaks were linked to Salmonella.
For context on the scale of risk, Fahey et al. (2006) tested 6,839 commercial sprout production drums — representing roughly 5 million consumer packages — and found an initial positive rate of only 0.75% for E. coli O157:H7 or Salmonella. Upon confirmatory retesting, only 3 drums were confirmed positive. However, this low rate was achieved under rigorous commercial sanitation protocols (20,000 ppm calcium hypochlorite seed treatment, controlled facilities). Home growers without equivalent sanitation and testing capabilities face a different risk profile — which is why the protocols below are important to follow consistently.
Who Should Avoid Raw Sprouts
The FDA recommends that children, elderly individuals, immunocompromised persons, and pregnant women should not eat raw sprouts. If you fall into one of these groups, the FDA advises avoiding raw sprouts entirely. Cooking sprouts thoroughly before consumption reduces but may not eliminate risk.
How to Minimize Risk at Home
Follow these protocols consistently for every batch:
- Start with certified seed. Use only seeds sold specifically for sprouting from suppliers who provide pathogen-tested lots.
- Sanitize all equipment before each batch — jar, lid, tray, everything that contacts the seeds or sprouts.
- Optional seed treatment: Soak seeds in 3% hydrogen peroxide preheated to 60°C (140°F) before the initial water soak. Commercial producers use 20,000 ppm calcium hypochlorite for 15 minutes followed by extensive rinsing, but hydrogen peroxide is more practical for home use.
- Drain completely after every rinse. Standing water is where problems begin.
- Keep sprouts away from pets, soil, and food-preparation splash zones during the growing period.
- Refrigerate promptly after harvest at 4°C (40°F).
- Discard immediately any batch that develops an off odor, slimy texture, or spreading mold.
Troubleshooting Common Issues
| Problem | Likely Cause | Solution |
|---|---|---|
| Mold (fuzzy white/gray growth) | Insufficient drainage; overcrowded jar | Drain more thoroughly; reduce seed quantity; rinse more frequently |
| Sour or off smell | Bacterial growth from standing water | Discard the batch; sanitize jar; improve drainage angle |
| Seeds not germinating | Old seed; water too hot or too cold | Use fresh sprouting seed; soak in lukewarm (not hot) water |
| Sprouts too leggy/elongated | Temperature above 26°C | Move to a cooler location (21-26°C optimal) |
| Pale/yellow sprouts | No light exposure | Move to indirect light on final day for greening; or accept as normal for dark-grown sprouts |
| Seed rot | Oversoaking or poor ventilation | Limit soak to 2-4 hours; ensure jar is well-ventilated during sprouting |
Advanced Troubleshooting Protocols
Beyond the common issues above, experienced sprout growers encounter subtler problems that require more nuanced diagnosis.
Root Hairs vs. Mold: Visual Identification
One of the most common false alarms in sprout growing is mistaking root hairs for mold. Root hairs are especially prominent on the second and third day of sprouting and are a sign of healthy growth. Here is how to tell them apart:
| Feature | Root Hairs (Normal) | Mold (Discard Batch) |
|---|---|---|
| Appearance | Fine white fuzz radiating from individual root tips | Web-like filaments connecting across multiple sprouts |
| Distribution | Concentrated around root zones only | Patchy, spreading across seed coats and between sprouts |
| Response to rinsing | Collapse flat against roots when wet, reappear when dry | Persist after rinsing; may feel slimy |
| Odor | Clean, mild cruciferous smell | Musty, earthy, or sour odor |
If in doubt, rinse the sprouts thoroughly — root hairs disappear under running water, while true mold persists. Any batch with confirmed mold or off odors should be discarded immediately.
Diagnosing Batch-to-Batch Variability
If you notice significant differences in sprout vigor, flavor intensity, or pungency between batches grown under identical conditions, the most likely explanation is seed lot variation. Triska et al. (2021) documented a 30-fold range in glucoraphanin potential between different seed sources, and Fahey & Kensler (2021) found levels ranging from 2 to 124 µmol/g across cultivars.
Diagnostic protocol:
- Isolate the variable. Grow two batches simultaneously — one from your current seed lot, one from a different supplier — using the same jar, water, temperature, and schedule.
- Compare at day 5. Assess sprout length, cotyledon color, pungency when chewed raw, and overall vigor.
- If the new lot performs better, switch suppliers. Seed glucoraphanin content is genetically determined and cannot be improved by growing conditions.
- Record your findings. Note supplier, lot number, and purchase date for every seed bag to build a performance baseline over time.
Temperature Monitoring Protocol
Dense germinating seed generates metabolic heat that can push internal jar temperatures above the optimal 21-26°C range, even when the room is within range. UC ANR recommends monitoring closely during the second day, when metabolic heat peaks.
- Measure jar temperature directly by placing a probe thermometer against the seed mass (not just ambient room temperature) during the second day.
- If internal temperature exceeds 28°C, rinse with cool water (15-18°C) and move the jar to a cooler location. Split oversized batches into two smaller jars.
- Track ambient temperature at the sprouting location across a 24-hour cycle. Many kitchens experience 3-5°C swings between day and night that can push sprouts outside the optimal range.
Water Quality Considerations
Potable tap water is adequate for most home sprouting, but water quality can affect results:
- Well water: Test for bacterial contamination before using for raw sprout production. Contaminated irrigation water is a recognized outbreak vector.
- Water temperature: Use cool water (15-22°C) for rinsing. Warm rinse water above 25°C accelerates metabolic activity and can exacerbate heat buildup in dense batches.
- Consistency: Use the same water source for all rinses within a batch to eliminate water quality as a variable when troubleshooting.
Batch Scheduling for Continuous Supply
Broccoli sprouts are a batch-based, year-round indoor crop with no seasonal restrictions. A single jar produces a harvest in about 5 days. To maintain a continuous supply, start a new jar every 2-3 days so one batch is always reaching harvest as another begins.
With three jars in rotation, you can harvest fresh sprouts every other day. In clinical research, participants typically consumed approximately 200 g of sprout homogenate, providing around 100 micromoles of sulforaphane. As with all brassicas, broccoli sprouts contain goitrogenic compounds; individuals with thyroid conditions should consult a healthcare professional before consuming large quantities daily.
Commercial Scaling Guide
For growers considering commercial broccoli sprout production, the transition from jar to drum or tray introduces specific equipment, regulatory, and food safety requirements that go beyond home-scale protocols.
Production Systems at Scale
UC ANR describes commercial sprouters as rustproof, easy-to-sanitize containers with reliable drainage and aeration. At scale, three primary system types are used:
- Rotating drums: Automate the rinse-and-drain cycle and provide consistent aeration. Used in the Fahey et al. (2006) study across 6,839 production drums. Best suited for operations producing hundreds of kilograms per week.
- Stacked draining trays: Lower capital cost and easily scalable by adding tray layers. Require manual rinsing and careful attention to drainage uniformity across trays.
- Jar or bucket arrays: Minimal investment and natural batch isolation (one contaminated jar does not affect others). Labor-intensive and limited in throughput, but a viable entry point for small commercial operations.
Batch size must match container capacity — seeds expand substantially during sprouting, and overfilled containers trap heat, CO₂, hulls, and water.
Regulatory Requirements (United States)
The FDA's 2023 guidance establishes specific requirements for commercial sprout production under the FSMA Produce Safety Rule:
- Seed sanitation: Treat seeds with an antimicrobial agent prior to each production batch. Fahey et al. (2006) documented the commercial standard: 20,000 ppm calcium hypochlorite for 15 minutes, followed by thorough rinsing. The FDA requires seed treatment as a preventive control.
- Spent irrigation water testing: Test spent irrigation water from each batch for E. coli O157:H7 and Salmonella. Do not release the batch for sale until test results are negative.
- Environmental monitoring: Maintain records of temperature, water source, sanitation protocols, and batch traceability.
- Hazard analysis: Develop a written food safety plan identifying biological hazards and preventive controls specific to sprout production.
Pathogen Testing in Practice
Fahey et al. (2006) at Johns Hopkins provided one of the most comprehensive real-world datasets on commercial sprout safety. Across 6,839 production drums — representing approximately 5 million consumer packages — the initial screening positive rate was 0.75% for E. coli O157:H7 or Salmonella. Upon confirmatory retesting, only 3 drums were confirmed positive.
This data demonstrates that with rigorous seed treatment and sanitation protocols, the contamination rate is low but non-zero. Routine pathogen testing should be budgeted as a fixed operating cost — each production batch requires testing before release to consumers.
Key Variable Costs
- Seed: Sprouting-grade broccoli seed from tested lots commands a premium over garden seed. Seed variety is the single largest determinant of product quality.
- Water and labor: Frequent rinsing every 4-6 hours consumes significant water at scale and requires staffing or automation.
- Pathogen testing: Required per batch under FDA guidance.
- Cold chain: Sprouts require continuous refrigeration at 4°C from harvest through retail.
Quick-Reference Summary
| Parameter | Recommendation | Source Basis |
|---|---|---|
| Seed type | Untreated, sprouting-certified | UC ANR, UC ANR, FDA |
| Soak time | 2-4 hours lukewarm or overnight | UC ANR |
| Temperature | 21-26°C (70-79°F) | UC ANR |
| Rinse frequency | Every 4-8 hours | UC ANR, Virginia Tech |
| Light | Optional; final-day exposure for greening | Zhang 2020, Oliveira 2015 |
| Harvest day | Day 4-5 (day 5 for peak sulforaphane) | Tian 2017, Le 2019 |
| Storage | 4°C (40°F); consume within 4-6 days | Tian 2017, Virginia Tech |
| Sulforaphane vs mature broccoli | 10-100x more precursor | Fahey 1997, Fahey 2021 |
Related Topics
If you are interested in growing nutrient-dense foods at home, you may also find these guides useful:
- Growing Turmeric — another bioactive-compound powerhouse with anti-inflammatory properties
- Growing Oyster Mushrooms at Home — a short-cycle indoor crop that, like sprouts, needs minimal equipment