DWC Hydroponics: Build a $25 System and Harvest in 30 Days
Build your first deep water culture system from just $25. This complete DWC hydroponics guide covers DIY setup, nutrient management, best plants, and troubleshooting — backed by research.
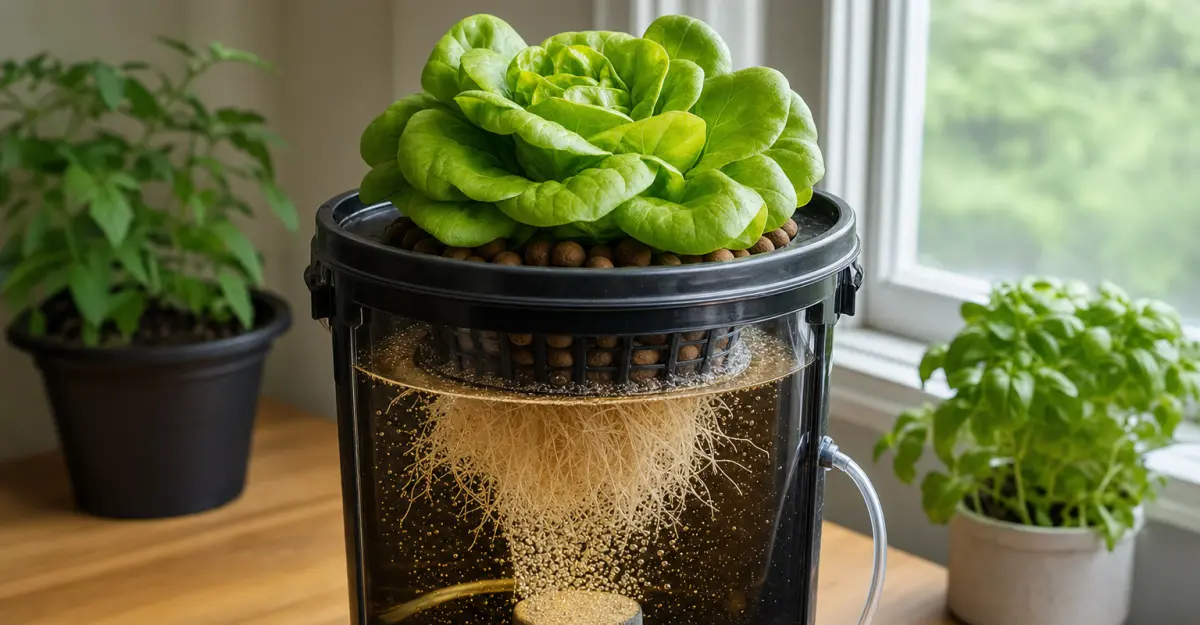
Key takeaway: Deep Water Culture (DWC) is a hydroponic method where plant roots are fully suspended in an oxygenated nutrient solution. An air pump and air stone continuously bubble oxygen into the water, keeping roots healthy and nutrient uptake efficient. DWC is one of the simplest and most productive hydroponic systems for home growers — a single 5-gallon bucket setup costs $25-40, and DWC systems can produce substantially faster growth than soil, with peer-reviewed comparisons reporting yield increases of 30% and higher depending on the crop and conditions. You can build one in under an hour.
What Is Deep Water Culture?
Deep Water Culture is a hydroponic growing method where plant roots hang directly in a reservoir of nutrient-rich water. Unlike Nutrient Film Technique (NFT) where a thin stream flows past roots, or the Kratky method where roots sit in a static solution, DWC keeps roots fully submerged in a deep, actively aerated reservoir.
The "deep" in Deep Water Culture refers to the reservoir depth — typically 4 to 12 inches of nutrient solution. The "culture" means the nutrient solution in which roots grow. An air pump pushes air through an air stone at the bottom of the reservoir, producing a continuous stream of bubbles that dissolves oxygen into the water. This dissolved oxygen is what separates DWC from a bucket of stagnant water where roots would suffocate and rot.
DWC has been used in academic research for decades as a standard method for studying plant nutrition and root physiology. A landmark 1996 study by Goto, Both, Albright, Langhans, and Leed at Cornell University tested dissolved oxygen levels in floating hydroponic culture and established that lettuce grows vigorously even at relatively low oxygen concentrations — but that continuous aeration provides the most consistent and reliable results. Since then, DWC has become one of the most common systems in both home growing and controlled environment agriculture research.
Virginia Tech Cooperative Extension and Oregon State University Extension both publish guides on DWC for home and small-scale growers, reflecting the method's accessibility and widespread adoption.
How DWC Works: The Science of Submerged Roots
A DWC system has three core components:
- Container and lid: A light-proof bucket or tote holds the nutrient solution. The lid supports the plant in a net pot above the water line.
- Air pump and air stone: An external air pump pushes air through tubing to an air stone sitting at the bottom of the reservoir. The stone breaks the air into fine bubbles, maximizing oxygen dissolution.
- Nutrient solution: Water mixed with hydroponic nutrients at a specific concentration and pH. The roots absorb nutrients directly from this solution.
This creates a simple but effective growing environment. Roots have unlimited access to water and nutrients (no dry cycles like in ebb-and-flow), and the continuous aeration provides the oxygen roots need for cellular respiration and nutrient uptake.
Why Aeration Matters
Plant roots are living tissue that requires oxygen to function. In soil, air pockets between particles supply this oxygen. In water, oxygen must be dissolved — and water holds far less oxygen than air. At 20°C, saturated water contains only about 9.1 mg/L of dissolved oxygen (dropping to 8.4 mg/L at 24°C, the temperature used in the Goto et al. study). Air, by comparison, contains roughly 280 mg/L of oxygen — about 30 times more concentrated.
Research by Goto et al. (1996) tested lettuce growth at dissolved oxygen (DO) concentrations of 2.1, 4.2, 8.4 (saturated), and 16.8 mg/L (supersaturated). They found no significant difference in fresh weight or dry weight across these concentrations, suggesting that lettuce is remarkably tolerant of low oxygen. However, this study used controlled laboratory conditions with clean water and no pathogens — conditions that rarely exist in home growing.
In practice, maintaining saturated DO levels (above 6-8 mg/L) serves a critical secondary purpose: suppressing root pathogens. Pythium and other root rot organisms thrive in low-oxygen conditions. Keeping dissolved oxygen high creates an environment that favors healthy root growth while making it hostile for anaerobic pathogens. This is why every university extension guide recommends continuous aeration rather than the theoretical minimum.
The Buffer Advantage
One of DWC's greatest practical strengths is its large water volume relative to the plant. A single 5-gallon bucket contains roughly 19 liters of nutrient solution. This thermal and chemical mass means:
- pH drifts slowly. A large volume resists rapid pH swings from root exudates or nutrient uptake.
- Temperature changes gradually. The water mass buffers against air temperature fluctuations.
- Nutrient depletion is gradual. Plants draw down nutrients over days, not hours.
Compare this to NFT, where a thin film of solution can experience rapid temperature changes and nutrient depletion within a single channel run. Or Kratky, where a small jar of solution can exhaust nutrients quickly with a fast-growing plant. DWC's volume gives you more margin for error — which is exactly why it is a strong choice for beginners.
DWC vs Other Hydroponic Methods
If you are deciding between DWC and another system, this comparison covers the practical differences.
| Feature | DWC | NFT | Kratky | Ebb and Flow |
|---|---|---|---|---|
| How it works | Roots submerged in aerated water | Thin film flows over roots in channels | Roots in static, declining solution | Roots periodically flooded and drained |
| Electricity required | Yes (air pump) | Yes (water pump runs continuously) | None | Yes (pump on timer) |
| Typical setup cost | $25-40 per bucket | $80-200 | $10-25 | $60-150 |
| Daily maintenance | Check pH and EC, top off water | Monitor flow, pH, EC | Check pH 1-2x/week | Check pH, EC, timer |
| Best crops | All types — leafy greens, herbs, fruiting plants | Leafy greens, herbs | Leafy greens, herbs | Versatile; herbs to fruiting |
| Water efficiency | High | Very high (recirculating thin film) | High | High |
| Failure risk | Medium (air pump failure gives hours of buffer) | High (pump failure = 20-30 min to wilt) | Very low (no moving parts) | Medium (pump or timer failure) |
| Scalability | Limited per-bucket (RDWC scales better) | Excellent (modular channels) | Low (one plant per container) | Good |
| Crop versatility | Excellent — supports heavy fruiting plants | Limited — large roots block channels | Good for small plants | Good |
When to Choose DWC
DWC is the strongest choice when you want to grow a wide range of plants — including heavy feeders like tomatoes and peppers — in a simple system that forgives mistakes. The deep reservoir buffers pH and temperature changes, giving you time to correct problems before plants suffer. Every plant type from lettuce to tomatoes can succeed in DWC, whereas NFT struggles with large-root fruiting crops that block its shallow channels.
DWC also excels at growing large individual plants. A single tomato plant in a 5-gallon DWC bucket can produce 20 or more pounds of fruit annually with proper lighting and nutrition — performance that is difficult to match in NFT or Kratky systems.
When NOT to Choose DWC
- You want maximum space efficiency. NFT's modular channels pack more plants per square meter than individual DWC buckets. For leafy green production at scale, NFT is more space-efficient.
- You want zero electricity dependency. The Kratky method has no moving parts. If power reliability is a concern, Kratky eliminates the risk entirely.
- You are scaling beyond 6-8 plants. Managing individual DWC buckets becomes tedious — each needs its own pH and EC monitoring. At this scale, consider RDWC (covered below) or NFT.
Building Your First DWC System
You can build a functional single-bucket DWC system in under an hour with materials from any hardware store. This is the lowest-cost entry point into active hydroponics.
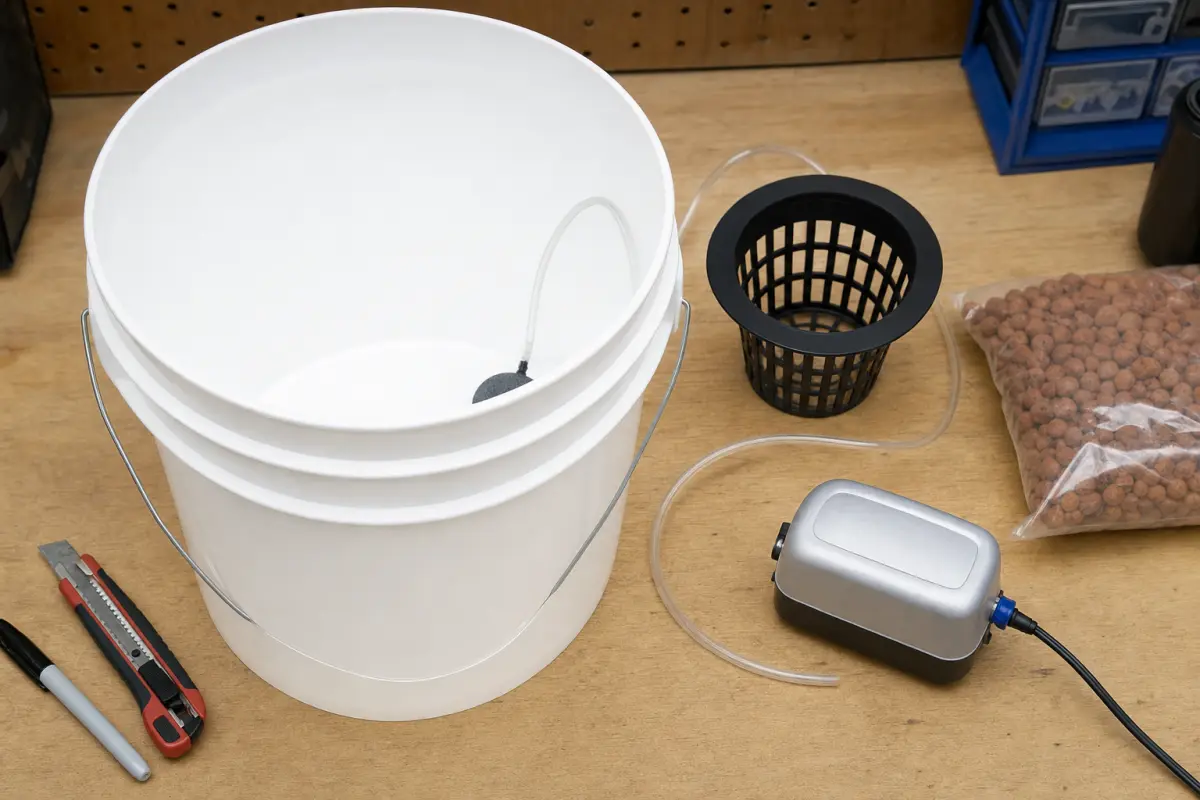
Materials List
| Item | Specification | Estimated Cost |
|---|---|---|
| Bucket | 5-gallon (19 L) food-grade with lid, opaque | $5-8 |
| Net pot | 6-inch (15 cm) diameter | $2-3 |
| Air pump | 4-6 watt, rated for 5+ gallons | $10-15 |
| Air stone | 4-inch cylindrical or disc | $3-5 |
| Airline tubing | 1/4-inch standard, 3-6 feet | $2-3 |
| Check valve | Inline, prevents backflow when pump is off | $2-3 |
| Growing medium | Clay pebbles (LECA) or hydroton, 2 liters | $5-8 |
| Hydroponic nutrients | General-purpose 2- or 3-part formula | $15-25 |
| pH test kit | Liquid drops or digital meter + pH Down | $8-15 |
| Total | $52-85 |
If you already have nutrients and a pH kit from a Kratky setup, the bucket-specific components cost only $25-40.
Step 1: Prepare the Bucket
Cut the net pot hole. Trace your 6-inch net pot centered on the bucket lid. Cut the hole using a hole saw, jigsaw, or sharp utility knife. The net pot should sit snugly in the hole with its lip resting on the lid — not falling through.
Drill the airline hole. Drill a small hole (just large enough for the airline tubing) through the lid near the edge. This is where the air line enters the bucket.
Light-proof check. Hold the bucket up to a bright light. No light should penetrate the walls or lid. Light entering the reservoir causes algae growth, which competes with roots for oxygen and nutrients. If your bucket is translucent, wrap it in opaque tape or paint it.
Step 2: Set Up the Air System
Connect the air pump to the air stone using airline tubing. Install a check valve inline between the pump and the bucket — this prevents water from siphoning back into the pump if power is lost. The check valve arrow should point toward the bucket (in the direction of airflow).
Place the air stone at the bottom center of the bucket. Thread the airline tubing up through the hole you drilled in the lid.
Position the air pump above the water line if possible. If the pump must sit below the water line, the check valve becomes critical to prevent backflow.
Turn on the pump and verify vigorous, consistent bubbling from the air stone.
Step 3: Mix Your Nutrient Solution
Fill the bucket with water, leaving a 1 to 2-inch (2.5-5 cm) gap between the water surface and the bottom of the net pot. This air gap allows the top portion of roots to access oxygen directly, while the lower roots remain submerged.
Add nutrients according to the manufacturer's instructions. For beginners, start at 50-75% of the recommended strength — you can always increase later, but overfeeding causes root burn.
Adjust pH to 5.5-6.5. Most tap water starts above 7.0, so you will likely need pH Down. Test with your pH kit and adjust in small increments.
Target ranges for first fill:
- pH: 5.8-6.2 (safe center for most crops)
- EC: 0.8-1.2 mS/cm for leafy greens and herbs at startup, 1.2-2.0 for fruiting plants
- Water temperature: 18-22°C (65-72°F)
Step 4: Plant and Monitor
Place your seedling (already started in a rockwool cube, peat plug, or starter medium) into the net pot. Fill around it with clay pebbles to support the plant upright. The bottom of the net pot should sit just at or slightly above the water surface — capillary action through the clay pebbles will wick moisture up to the roots until they grow down into the solution.
For the first week, keep the water level touching the bottom of the net pot. Once roots reach into the solution (visible through the net pot holes), you can let the level drop to maintain the 1-2 inch air gap.
Lighting: If growing indoors, provide 14-16 hours of light per day. Leafy greens need 200-400 umol/m2/s PPFD. Fruiting plants (tomatoes, peppers) need 400-600 umol/m2/s.
Daily monitoring for the first two weeks:
- Check that the air pump is running and bubbling
- Test pH (adjust if outside 5.5-6.5)
- Check water level (top off with pH-adjusted water as needed)
Once you are comfortable with the routine, you can reduce pH checks to every 2-3 days. Virginia Tech Extension recommends checking pH and EC two to three times weekly.
Best Plants for DWC
DWC's deep reservoir and active aeration make it one of the most versatile hydroponic systems. Unlike NFT, which is limited to shallow-rooted crops, DWC supports everything from fast-growing herbs to heavy fruiting plants.
Ideal Crops — Beginner-Friendly
| Plant | pH | EC (mS/cm) | Bucket Size | Days to Harvest | Notes |
|---|---|---|---|---|---|
| Lettuce (all types) | 5.5-6.2 | 0.8-1.2 | 5 gal | 30-45 | The easiest DWC crop. Butterhead, romaine, and loose-leaf all perform well. |
| Basil | 5.5-6.5 | 1.0-1.6 | 5 gal | 21-28 | Fast grower, high yield. Pinch growing tips for bushier plants. |
| Spinach | 5.5-6.5 | 1.2-1.8 | 5 gal | 30-45 | Keep solution below 22°C to prevent bolting. |
| Mint | 5.5-6.0 | 1.2-1.6 | 5 gal | 21-30 | Vigorous root growth — monitor that roots don't clog the air stone. |
| Kale | 5.5-6.5 | 1.4-1.8 | 5 gal | 45-60 | Larger plant; may need support as it matures. |
| Cilantro | 6.0-6.5 | 1.0-1.4 | 5 gal | 21-35 | Bolts quickly in warm conditions. Keep reservoir cool. |
Intermediate — Fruiting Crops
| Plant | pH | EC (mS/cm) | Bucket Size | Days to Harvest | Notes |
|---|---|---|---|---|---|
| Tomatoes | 5.5-6.5 | 2.0-3.5 | 5-10 gal | 60-90 | High nutrient demand. Use a larger bucket (10 gal) for indeterminate varieties. Requires support structure. |
| Peppers | 5.5-6.5 | 1.8-2.8 | 5-10 gal | 70-90 | Similar care to tomatoes. Bell peppers need 10+ gallon reservoirs. |
| Cucumbers | 5.5-6.0 | 1.6-2.5 | 10 gal | 50-70 | Heavy water drinker — check reservoir daily. Needs trellis support. |
| Strawberries | 5.5-6.5 | 1.0-1.8 | 5 gal | 60-90 | Select day-neutral varieties. One crown per 5-gallon bucket. |
Not Recommended for DWC
| Plant | Why |
|---|---|
| Root vegetables (carrots, beets, radishes) | Need solid growing medium for root expansion — submerged roots cannot form proper storage organs. |
| Corn | Tall, top-heavy plant with massive root system. Impractical in buckets. |
| Large brassicas (broccoli, cauliflower) | Very long growth cycle (90-120 days) with heavy nutrient demands. Possible but inefficient vs. soil or ebb-and-flow. |
Crop-Specific DWC Optimization by Growth Stage
The general ranges above will get you growing, but maximum yield requires adjusting parameters as plants move through growth stages.
Lettuce (All Types)
| Stage | Days | EC (mS/cm) | pH | PPFD (umol/m2/s) | Notes |
|---|---|---|---|---|---|
| Seedling/transplant | 1-7 | 0.5-0.8 | 5.8-6.0 | 150-200 | Keep EC low to avoid root burn. Ensure water touches net pot bottom. |
| Vegetative growth | 8-25 | 0.8-1.2 | 5.5-6.0 | 250-400 | Main growth phase. Increase EC gradually as leaf area expands. |
| Head formation | 26-35 | 1.0-1.4 | 5.5-6.0 | 400-500 | Higher light drives denser heads. |
| Pre-harvest | 36-45 | 0.6-0.8 | 5.8-6.2 | 300-400 | Reduce EC 3-5 days before harvest to improve flavor and reduce bitterness. |
Tomatoes
| Stage | Days | EC (mS/cm) | pH | PPFD (umol/m2/s) | Notes |
|---|---|---|---|---|---|
| Seedling/transplant | 1-14 | 1.0-1.4 | 5.8-6.2 | 200-300 | Start at half strength. Support the stem early. |
| Vegetative growth | 15-40 | 1.8-2.5 | 5.5-6.0 | 400-500 | Ramp EC as plant grows. Begin training to trellis. |
| Flowering/fruiting | 41-70 | 2.2-3.5 | 5.5-6.0 | 500-600 | Peak nutrient demand. Higher EC drives more flavorful fruit. Increase calcium to prevent blossom end rot. |
| Harvest/production | 70+ | 2.0-3.0 | 5.5-6.2 | 500-600 | Maintain steady EC. Harvest ripe fruit promptly to encourage continued production. |
Basil
| Stage | Days | EC (mS/cm) | pH | PPFD (umol/m2/s) | Notes |
|---|---|---|---|---|---|
| Seedling/transplant | 1-7 | 0.6-0.8 | 5.8-6.2 | 150-200 | Delicate roots at transplant. Avoid EC shock. |
| Vegetative growth | 8-18 | 1.0-1.4 | 5.5-6.0 | 300-400 | Pinch growing tips at the 6-leaf stage for bushier growth. |
| Production | 19-28+ | 1.2-1.6 | 5.5-6.0 | 400-500 | Harvest every 7-10 days above a leaf node. Continuous harvest extends production to 60+ days. |
Key DWC Optimization Principles
- EC ramping: Start every crop at 50-60% of target EC and increase over the first week. Transplant shock makes young roots vulnerable to salt stress.
- Reservoir temperature: Every 1°C increase above 20°C reduces dissolved oxygen capacity. In warm conditions, increase aeration or use a reservoir chiller.
- Light-EC relationship: Higher light intensities drive faster nutrient uptake. When increasing PPFD, increase EC proportionally — otherwise plants show deficiency symptoms despite adequate solution concentration.
- Fruiting crop calcium: Tomatoes and peppers in DWC are prone to blossom end rot (calcium deficiency in the fruit). Maintain calcium levels at 150-200 ppm and ensure adequate air circulation around plants for consistent transpiration.
Nutrient Management for DWC
DWC's large reservoir volume is a significant advantage for nutrient stability. A 5-gallon bucket holds 19 liters of solution — far more volume per plant than NFT or Kratky systems, which means nutrient concentrations and pH change more gradually.
pH and EC Targets
| Crop Type | pH Range | EC (mS/cm) |
|---|---|---|
| Leafy greens (lettuce, spinach, kale) | 5.5-6.2 | 0.8-1.2 |
| Herbs (basil, cilantro, mint, parsley) | 5.5-6.5 | 1.0-1.6 |
| Fruiting plants (tomatoes, peppers) | 5.5-6.5 | 2.0-3.5 |
| Strawberries | 5.5-6.5 | 1.0-1.8 |
Virginia Tech Extension recommends checking pH and EC two to three times weekly and suggests that many leafy greens perform well at EC 1.2-2.0 mS/cm — the lower ranges in the table above (0.8-1.2) reflect a conservative startup range commonly used by home growers. In DWC, pH tends to rise over time as plants absorb nutrients — this is normal and easily corrected with pH Down.
A 2025 study testing lettuce in DWC at pH 6.3, 7.0, and 8.3 found that cultivar selection and pH interact significantly. The cultivar Rex produced the highest yield at pH 7.0 (132 g/plant) with a water use efficiency of 68.7 g/L, nearly double that of less-adapted cultivars. This underscores that while the standard 5.5-6.5 range works for most plants, some cultivars tolerate a broader pH range in DWC's buffered environment.
Reservoir Management
Top-off protocol: Plants consume water faster than they consume nutrients. As the water level drops, the remaining solution becomes more concentrated (higher EC). Always top off with plain, pH-adjusted water — not full-strength nutrient solution. This prevents EC from climbing to toxic levels.
Full solution changes: Replace the entire nutrient solution every 7 to 14 days. Oregon State Extension recommends regular solution replacement to prevent nutrient imbalances and salt buildup. Between changes, monitoring EC tells you when nutrients are depleting (EC drops) versus when water is evaporating (EC rises).
Water level: Maintain at least a 1-inch (2.5 cm) air gap between the water surface and the bottom of the net pot. This gap allows the upper roots to access atmospheric oxygen directly while the lower roots absorb nutrients from the solution. Virginia Tech Extension recommends a reservoir depth of 4 to 12 inches depending on the system design.
Solution Temperature
Keep the nutrient solution between 18 and 22°C (65-72°F). This range optimizes three things simultaneously:
- Dissolved oxygen capacity. Cold water holds more oxygen. At 20°C, saturated water holds about 9.1 mg/L; at 30°C, it drops to about 7.6 mg/L.
- Root metabolism. Nutrient uptake and root respiration are most efficient in the 18-22°C range.
- Pathogen suppression. Pythium aphanidermatum, the most destructive hydroponic root rot organism, grows aggressively above 24°C.
If your growing area is warm, insulate the bucket (wrap in reflective material), keep it out of direct light, and consider a small aquarium chiller for temperatures consistently above 24°C.
Common DWC Problems and Solutions
| Problem | Cause | Solution |
|---|---|---|
| Root rot (brown, slimy roots) | Low oxygen, high temperature (>24°C), pathogen introduction | Keep solution temperature below 22°C. Ensure the air pump runs 24/7. Add beneficial bacteria (Hydroguard or similar). If active rot: remove affected roots, flush with hydrogen peroxide (3 mL of 3% solution per liter), replace solution. |
| Algae growth (green water or green film) | Light entering the reservoir through translucent bucket, lid gaps, or uncovered net pot | Light-proof all surfaces. Wrap the bucket in foil or use an opaque bucket. Cover any gaps around the net pot with a foam collar or tape. |
| pH swings (rapid rise or drop) | Small reservoir volume, heavy feeding plants, or tap water with low buffering | Use a larger reservoir (10 gal for fruiting plants). Top off with pH-adjusted water. For persistent drift, buffer with a small amount of calcium carbonate. |
| Nutrient burn (brown leaf tips, curling) | EC too high — often from topping off with nutrient solution instead of water | Drain and refill with fresh, lower-strength solution. Always top off with plain water. Start new plants at 50% nutrient strength. |
| Slow growth or yellowing | EC too low, pH outside range, or insufficient light | Test EC and pH. Increase nutrient concentration if EC is below the target range. Verify pH is 5.5-6.5. Check that light levels are adequate. |
| Water temperature too high | Grow lights heating the reservoir, warm room | Move the reservoir away from light sources. Use a white or reflective bucket. Add frozen water bottles as emergency cooling. Invest in an aquarium chiller for chronic issues. |
| Air pump failure | Power outage, worn diaphragm | DWC provides hours of buffer (unlike NFT's 20-30 minutes), but replace the pump immediately. Keep a spare $10 pump on hand. A battery-backup power strip ($30-50) prevents outages from killing plants. |
The Air Pump Is Your Lifeline
This is the single moving part in a DWC system, and everything depends on it. If the air pump stops, dissolved oxygen begins to decline. In DWC, the large water volume and the air gap above the solution provide more buffer time than NFT (where plants wilt in 20-30 minutes). A healthy DWC system can survive several hours without aeration before roots show stress — but this is emergency margin, not a design feature.
Protect against pump failure:
- Keep a spare air pump ($10-15) in your growing area.
- Use a battery-backup surge protector ($30-50) to maintain power during short outages.
- For systems with multiple buckets, consider a dual-output commercial air pump that is more reliable than consumer aquarium pumps.
Advanced Troubleshooting Protocols
The common problems table covers the basics. These protocols address diagnostic processes for DWC-specific issues.
Root Health Assessment Protocol
Healthy DWC roots are bright white, firm, and have a fresh smell. Root problems in DWC develop more slowly than in NFT (thanks to the larger water volume), but they also spread differently — the entire root mass is submerged, so localized issues become systemic quickly.
Symptoms of root stress (in order of severity):
- Root tips turning light tan — still firm, no odor. Early warning only visible if you lift the net pot regularly.
- Slight sliminess on root surfaces, faint musty smell. Dissolved oxygen likely below 4 mg/L.
- Brown discoloration spreading from tips inward, visible slime, clear odor. Active Pythium infection.
- Roots dark brown to black, mushy, strong rotting odor. Advanced infection — plant may be unsalvageable.
Diagnostic steps:
- Measure solution temperature. If above 24°C, temperature-induced oxygen depletion is the likely root cause.
- Check that the air pump is running and the air stone is producing vigorous bubbles. A clogged air stone produces weak, uneven bubbling.
- Smell the solution. Healthy nutrient solution has a mild mineral odor. A sour or rotten smell indicates anaerobic conditions.
- Test pH and EC. Extreme pH drift (below 4.5 or above 7.5) damages roots directly.
Recovery protocol:
- Remove the plant and trim all brown, slimy root tissue with sterilized scissors. Healthy white roots must remain.
- Clean the bucket with hydrogen peroxide (10 mL of 3% H2O2 per liter, rinse thoroughly).
- Replace with fresh nutrient solution at 50% strength.
- Reduce solution temperature below 20°C (add frozen water bottles if needed).
- Add a beneficial bacteria product to recolonize roots with healthy microbes.
- Monitor daily for 7 days before returning to normal maintenance schedule.
Nutrient Lockout Diagnosis
DWC is less prone to nutrient lockout than NFT because of its larger solution volume, but lockout still occurs — usually from pH drift over several days.
| Symptom | Likely Cause | Check | Action |
|---|---|---|---|
| New growth is pale yellow, old leaves green | Iron lockout (pH too high) | Measure pH — likely above 6.5 | Lower pH to 5.8-6.0 with pH Down. Iron becomes unavailable above pH 6.5. |
| Brown edges on young leaves | Calcium deficiency from EC spike | Measure EC — likely above range | Drain and replace solution. Top off with water only. |
| Purple/red stems with stunted growth | Phosphorus lockout (pH too low) | Measure pH — likely below 5.0 | Raise pH to 5.5-6.0 with pH Up. |
| Interveinal chlorosis on middle leaves | Magnesium deficiency | Check Ca:Mg ratio | Supplement with Epsom salt (magnesium sulfate) at 0.5 g/L. |
| Blossom end rot on tomatoes/peppers | Calcium transport failure | Check airflow and solution temp | Increase air circulation. Keep solution below 22°C. Ensure adequate calcium (150-200 ppm). |
Advanced: Recirculating DWC (RDWC)
Standard DWC works beautifully for 1-6 individual plants, but managing separate buckets becomes impractical at larger scale. Each bucket needs individual pH and EC testing, individual top-offs, and individual solution changes.
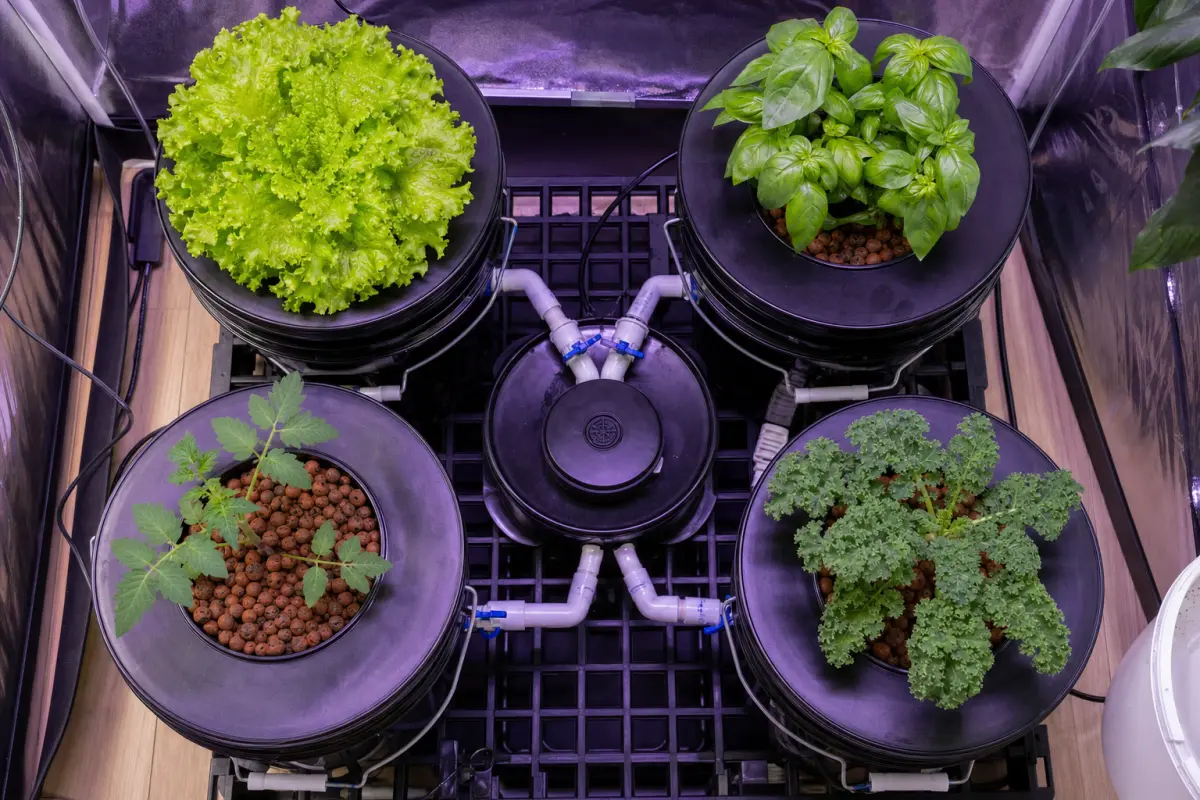
Recirculating Deep Water Culture (RDWC) solves this by connecting multiple grow buckets to a central reservoir. A water pump circulates the nutrient solution between the central reservoir and each grow site, so all plants share the same solution.
How RDWC Works
In an RDWC system:
- Each grow bucket connects to a central control reservoir via PVC pipe or tubing.
- A pump in the central reservoir pushes fresh solution into each grow bucket.
- Solution drains from each bucket back into the central reservoir by gravity.
- This creates continuous circulation — nutrients, pH, and temperature stay uniform across all buckets.
The central reservoir is where you monitor and adjust. One pH reading, one EC reading, one top-off applies to the entire system. This reduces maintenance time dramatically — managing 8 RDWC buckets takes roughly the same time as managing 2 individual DWC buckets.
When to Consider RDWC
- You want to grow more than 6 plants using DWC principles.
- You want uniform conditions across all plants (critical for consistent harvests).
- You are growing a single crop type where all plants need the same nutrient concentration.
RDWC Trade-offs
| Advantage | Disadvantage |
|---|---|
| Centralized monitoring and adjustment | More complex plumbing (leak risk at connections) |
| Uniform pH, EC, and temperature | If one plant gets root rot, it can spread to all plants |
| One reservoir change services all buckets | Higher initial cost ($150-300 for a 4-8 site system) |
| Larger total water volume = more stability | Not ideal for mixed crops with different nutrient needs |
RDWC System Design Guide
Building a reliable RDWC system requires more planning than a single DWC bucket. The plumbing connections, pump sizing, and reservoir configuration all affect system stability.
Component Sizing
| Component | Specification | Reasoning |
|---|---|---|
| Central reservoir | 10-20 gallons + 1-2 gallons per grow site | Total system volume should equal at least 3 gallons per plant. Larger reservoirs buffer better. |
| Grow buckets | 5-gallon each (standard) or 3.5-gallon for herbs | Must be identical in size and at equal height for even flow distribution. |
| Circulation pump | 200-400 GPH | Flow should turn over the total system volume 2-4 times per hour. Overpumping causes turbulence and root damage. |
| Connection pipes | 2-inch PVC or uniseal bulkhead fittings | Oversized connections prevent blockages from root debris. 3/4-inch fittings clog easily. |
| Air pump | 1 watt per gallon of total system volume | Each grow bucket still needs its own air stone. Some growers add an air stone to the central reservoir as well. |
Layout Principles
- Keep all buckets at the same height. Water seeks its own level. If one bucket sits higher, it drains into lower buckets, creating uneven levels.
- Central reservoir sits below the grow buckets so solution returns by gravity. Even a 2-inch height difference is sufficient for gravity return.
- Route return plumbing with a slight downward slope (1-2% grade) to prevent stagnant zones where biofilm can accumulate.
- Include a ball valve on each bucket's supply line. This allows you to isolate any bucket for cleaning, plant removal, or disease quarantine without shutting down the entire system.
Disease Management in RDWC
The shared solution is RDWC's greatest strength and its biggest vulnerability. A Pythium infection in one bucket rapidly spreads to every connected bucket.
Prevention:
- Maintain solution temperature below 22°C at the central reservoir.
- Use beneficial bacteria in the central reservoir — the large volume makes the inoculation cost-effective.
- Inspect roots at each grow site weekly. Quarantine and disconnect any bucket showing early signs of root stress (tan discoloration, slight sliminess).
- Between crop cycles, flush the entire system (pipes, reservoir, buckets) with hydrogen peroxide, then rinse with clean water before replanting.
Key Takeaways
- DWC suspends plant roots in a deep, actively aerated nutrient solution. The air pump and air stone provide continuous oxygen, making it one of the simplest and most productive hydroponic methods for home growers.
- A single 5-gallon bucket setup costs $25-40 (if you already have nutrients and a pH kit) and supports any crop from lettuce to tomatoes.
- Critical parameters: pH 5.5-6.5, EC 0.8-3.5 mS/cm (depending on crop), water temperature 18-22°C, continuous aeration.
- DWC's large reservoir volume buffers pH, temperature, and nutrient changes — giving beginners more time to correct mistakes than NFT or Kratky systems.
- The biggest risk is air pump failure, but DWC provides hours of buffer time (unlike NFT's 20-30 minutes). A battery-backup power strip and a spare pump eliminate this risk.
- For more than 6 plants, upgrade to RDWC — connected buckets sharing a central reservoir reduce maintenance from per-bucket to per-system.
- Research confirms that even moderate dissolved oxygen levels support vigorous lettuce growth, but maintaining saturated levels (>6 mg/L) provides the critical secondary benefit of suppressing root pathogens.
Ready to start growing? Explore our plant database for specific growing parameters, or calculate your nutrient mix for exact dosing. If you want a simpler starting point, try the Kratky method first.
FAQ
How often do you change the water in DWC? Replace the full nutrient solution every 7 to 14 days. Between changes, top off with plain, pH-adjusted water as the level drops. If EC rises above your target range before the scheduled change, do an early change.
What size air pump do I need for DWC? A general guideline is 1 watt per gallon of reservoir volume. For a 5-gallon bucket, a 4-6 watt aquarium air pump is sufficient. It is better to slightly oversize than undersize — excess aeration does not harm plants.
Can you grow tomatoes in DWC? Yes — DWC is one of the best hydroponic methods for tomatoes. Use a 5-10 gallon bucket, maintain EC at 2.0-3.5, and provide a support structure (trellis or cage). A single tomato plant in DWC can produce 20 or more pounds of fruit per year with proper lighting.
What is the ideal water temperature for DWC? 18-22°C (65-72°F). Below 16°C, nutrient uptake and growth slow significantly. Above 24°C, dissolved oxygen drops and root rot risk increases sharply.
Is DWC better than Kratky for beginners? Both are excellent for beginners. Kratky is simpler (no electricity, no moving parts) and costs less to start. DWC produces faster growth and supports a wider range of crops, but requires an air pump and daily monitoring during the first few weeks. If you want a zero-risk introduction, start with Kratky; if you want faster results and more crop options, go with DWC.
How long do DWC plants take to grow? Growth rates in DWC are typically faster than soil — studies report yield increases of 30% and higher. Lettuce reaches harvest in 30-45 days, basil in 21-28 days, and tomatoes produce first fruit in 60-90 days from transplant.