Hydroponic Basil Grows 2x Faster (If You Nail These 3 Things)
The 3 things that make hydroponic basil grow 2x faster than soil: system choice, nutrient management (EC/pH by stage), and optimized LED lighting. Science-backed guide covering DWC, NFT, Kratky, aeroponics, varieties, pruning, pest control, and yields up to 438 g per plant.
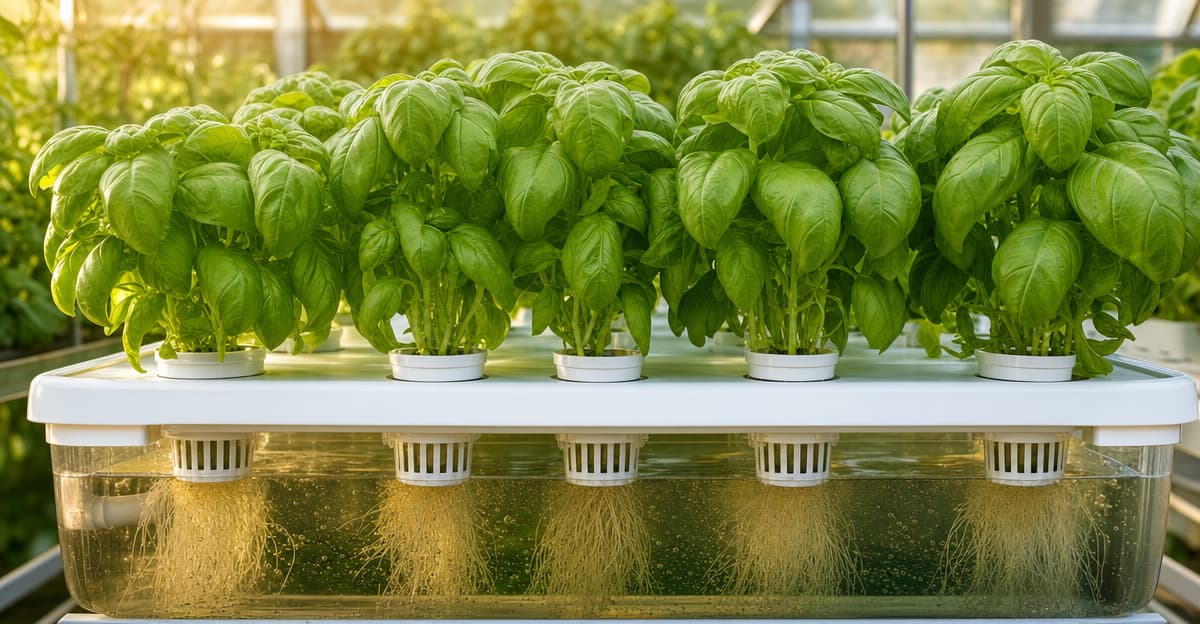
Key takeaway: Hydroponic basil (Ocimum basilicum) grows twice as fast as soil-grown basil and produces continuous harvests for months from a single plant. In a 2021 Scientific Reports study, aeroponics produced 438.6 g of fresh basil per plant at 7 weeks -- nearly 2.3 times the yield of a drip system (188 g) and 1.9 times DWC (229.3 g). Every major hydroponic system works for basil, from a simple Kratky jar on a windowsill to a commercial NFT operation. The keys to success are maintaining EC between 1.0-1.6 mS/cm, providing at least 12 mol/m2/day of light, and pinching stems regularly to promote branching. With the right setup, one plant produces 0.5 kg of fresh leaves over its lifetime -- and you can harvest every 7-10 days once it's established.
Why Grow Basil Hydroponically?
Basil (Ocimum basilicum) is one of the most popular culinary herbs worldwide -- and one of the best-suited for hydroponic cultivation. Even beginners can expect better results than soil growing:
- Faster growth and earlier harvests. Hydroponic basil reaches first harvest in 3-4 weeks from transplant, compared to 6-8 weeks in soil. NFT-grown basil produced plants 40.4 cm tall versus 30.8 cm in ebb-and-flow systems over the same period.
- Higher yields per plant. Aeroponic basil produced 438.6 g fresh weight per plant at 7 weeks -- more than double the 188 g from substrate-based drip systems. Even simple DWC delivered 229.3 g per plant.
- Year-round production. Under 14-16 hours of LED light at 18-28 C, hydroponic basil grows continuously with no dormancy. Outdoor basil is limited to a single frost-free season.
- Better essential oil quality. Controlled indoor environments produced the highest essential oil content compared to outdoor and greenhouse basil, because you control light spectrum, nutrients, and temperature precisely.
- No soil-borne disease. Eliminating soil removes the risk of Fusarium oxysporum f. sp. basilici, a devastating soil-borne pathogen that is nearly impossible to eradicate once established.
- Compact footprint. A single NFT channel or DWC bucket on a countertop can supply a household with fresh basil year-round.
If you've already grown hydroponic mint or indoor herbs, basil uses similar systems and techniques but rewards you with faster visible growth and one of the most versatile culinary herbs available.
Best Hydroponic Systems for Basil
Basil is a shallow-rooted herb with moderate water demand -- it thrives in virtually every hydroponic system. Your choice depends on scale, budget, and how hands-on you want to be.
| System | Suitability | Yield (g/plant, 7 wk) | Best For | Setup Cost |
|---|---|---|---|---|
| Aeroponics | Excellent | 438.6 | Highest yield; commercial | $150-400 |
| DWC (Deep Water Culture) | Excellent | 229.3 | Beginners; reliable | $20-60 |
| NFT (Nutrient Film Technique) | Excellent | High (tallest plants) | Multi-plant setups; herbs | $60-200 |
| Drip / Substrate | Good | 188.0 | Commercial; mixed crops | $50-150 |
| Ebb & Flow | Good | Moderate | Home growers; multiple herbs | $60-150 |
| Kratky (Passive) | Good | Moderate | Zero maintenance; single plants | $5-15 |
Aeroponics -- Highest Yield
Aeroponics delivered the highest basil yield (438.6 g/plant) and the highest essential oil content in the Khater et al. (2021) study, with the lowest production cost per kilogram. Roots hang suspended in air and are misted with nutrient solution every few minutes, providing 100% oxygen access. The downside: aeroponic systems are more complex and expensive, and nozzle clogging requires regular maintenance. Best for serious growers chasing maximum productivity.
DWC -- Best for Beginners
Deep Water Culture is the easiest high-performance system for basil. Roots sit in a constantly aerated nutrient solution, producing 229.3 g/plant at 7 weeks. A 5-gallon bucket with an air pump and air stone is all you need. DWC is forgiving of minor mistakes and produces consistent results.
For the simplest possible setup, a Kratky mason jar (passive DWC without an air pump) works for a single basil plant on a kitchen windowsill. Yields are lower, but maintenance is zero -- just top up the solution every 1-2 weeks.
NFT -- Best for Multiple Plants
Nutrient Film Technique runs a thin stream of nutrient solution through channels where basil roots grow. NFT-grown basil produced the tallest plants (40.4 cm vs 30.8 cm in ebb-and-flow) with superior root development (34 cm vs 28.3 cm root length). NFT is the commercial standard for herb production. The shallow channels are perfectly sized for basil's modest root system.
Drip and Ebb & Flow -- Versatile Options
Drip systems using coco coir, perlite, or peat slabs produced 188 g/plant -- lower than DWC or aeroponics, but still excellent. Ebb and flow cycles nutrient solution in and out of a tray, providing good root oxygenation between floods. Both work well when growing basil alongside other herbs or leafy greens in the same system.
Best Basil Varieties for Hydroponics
Variety selection matters for both flavour and disease resistance. The biggest threats to hydroponic basil are downy mildew (Peronospora belbahrii) and Fusarium wilt -- choosing resistant varieties eliminates most disease problems before they start.
Sweet / Genovese -- The Classic Choice
Large, aromatic leaves ideal for pesto, caprese, and Italian cooking. This is the standard commercial hydroponic basil.
| Variety | Disease Resistance | Notes |
|---|---|---|
| Prospera DMR | DM + Fusarium | Gold standard; Genovese flavour with full disease resistance |
| Nufar (F1) | Fusarium | Vigorous; large-leaf Genovese; widely available |
| Genovese (standard) | None | Classic flavour; susceptible to DM and Fusarium |
| Elindra | Moderate DM | Large leaves; commercial favourite |
Disease-Resistant Varieties -- Best for Indoor Growing
Indoor humidity makes downy mildew a real threat. These varieties are bred specifically for resistance.
| Variety | DM Resistance | Fusarium Resistance | Notes |
|---|---|---|---|
| Prospera series | Excellent | Yes | Multiple leaf types available (Genovese, Italian Large Leaf) |
| Rutgers Devotion | Excellent | Moderate | Large, ruffled leaves; productive |
| Rutgers Obsession | Excellent | Yes | Best dual-resistance option |
| Amazel | Excellent | No | Vigorous; good for containers |
| Rutgers Thunderstruck | Excellent | Moderate | Newer release; high yield |
Specialty Types
| Variety | Type | Notes |
|---|---|---|
| Thai basil | Anise/licorice flavour | Compact; sturdy stems; good in DWC |
| Purple Ruffles / Red Rubin | Purple leaf | Ornamental + culinary; slightly lower yield |
| Lemon basil | Citrus flavour | Delicate; best in NFT or DWC |
| Bush basil (Spicy Globe) | Compact, small-leaf | Ideal for small spaces and Kratky jars |
For most growers, Prospera DMR is the best starting point -- you get classic Genovese flavour with resistance to both major diseases.
From Seed to System: Germination and Transplanting
Starting from Seed
- Soak seeds for 1-4 hours in room-temperature water. Basil seeds develop a mucilaginous coating when wet, which aids germination.
- Sow in starter plugs. Place 2-3 seeds per rockwool cube, rapid rooter, or coco plug, about 6 mm (1/4 inch) deep. Cover lightly.
- Maintain 24-27 C (75-80 F). Basil germinates optimally at 25-30 C. Below 20 C, germination becomes unreliable. A heat mat speeds things up.
- Keep moist, not soaked. Mist daily or cover with a humidity dome. Remove the dome once seeds sprout.
- Expect sprouts in 5-7 days at optimal temperature (up to 14 days in cooler conditions).
- Provide light immediately after emergence. Seedlings need 14-16 hours of light at 150-200 umol/m2/s PPFD to prevent legginess.
Starting from Cuttings
A faster alternative: cut the top 10 cm of a healthy, non-flowering stem just below a node at a 45-degree angle. Remove lower leaves and place in water or a moist growing medium. Roots develop in 7-10 days. Transplant once roots reach 3-5 cm.
Transplanting to Your System
Move seedlings when they have 2-3 sets of true leaves -- typically 2-3 weeks after germination. Handle by the leaves, never the stem. Place in net pots with clay pebbles (LECA) or your growing medium of choice. Start nutrient solution at half strength (EC 0.5-1.0) for the first 3-5 days, then ramp to full vegetative concentration.
Spacing: 15-25 cm (6-10 inches) between plants. Wider spacing (20-25 cm) reduces downy mildew risk and improves air circulation.
Nutrient Solution and EC/pH Management
Basil is a moderate feeder that doesn't need excessively high nutrient concentrations. Research consistently shows that yield can decrease when EC is too high.
Stage-Specific EC and pH Targets
| Growth Stage | Duration | EC (mS/cm) | pH | Key Nutrient Focus |
|---|---|---|---|---|
| Seedling | 2-3 weeks | 0.5-1.0 | 5.5-6.5 | Half-strength; balanced |
| Vegetative (active growth) | Ongoing | 1.0-1.6 | 5.5-6.5 | Nitrogen for leaf production |
| Pre-flower (if bolting) | -- | 1.0-1.4 | 5.5-6.5 | Reduce N slightly; pinch flowers |
Unlike fruiting crops like cucumbers or tomatoes that shift from vegetative to fruiting formulas, basil stays on a vegetative formula its entire life. The goal is always leaf production -- you prevent flowering through regular pruning.
Macronutrient Targets (ppm)
| Nutrient | Seedling | Vegetative |
|---|---|---|
| Nitrogen (N) | 100-150 | 150-210 |
| Phosphorus (P) | 30-45 | 40-60 |
| Potassium (K) | 120-180 | 180-250 |
| Calcium (Ca) | 150-200 | 150-200 |
| Magnesium (Mg) | 40-70 | 40-70 |
| Sulfur (S) | 50-90 | 50-90 |
Data from Cornell/Penn State nutrient recipes and Khater et al. (2021). Note the high calcium requirement -- basil needs 150-200 ppm Ca throughout growth, more than most leafy herbs. The target NPK ratio is approximately 3:1:2.
Micronutrient Requirements
| Micronutrient | Target (ppm) |
|---|---|
| Iron (Fe) | 1.0-2.8 |
| Manganese (Mn) | 0.25-0.55 |
| Boron (B) | 0.16-0.50 |
| Zinc (Zn) | 0.05-0.15 |
| Copper (Cu) | 0.02-0.05 |
| Molybdenum (Mo) | 0.01-0.05 |
Use chelated iron (Fe-DTPA) to maintain availability across the 5.5-6.5 pH range. Basil has a notably high iron requirement -- deficiency causes interveinal chlorosis on young leaves. See our nutrient deficiency chart for visual identification.
Magnesium -- The Most Common Deficiency
Magnesium deficiency is the most frequently observed nutritional disorder in hydroponic basil. Symptoms appear first as interveinal chlorosis on older leaves, progressing to necrotic brown patches. Maintain Mg at 40-70 ppm with a Ca:Mg ratio between 2:1 and 4:1. Supplement with Epsom salts (magnesium sulfate) if symptoms appear. Foliar spray provides faster relief than root-zone correction.
For precise nutrient calculations based on your system and nutrient brand, use the Truleaf Nutrient Manager.
Stage-Specific Nutrient Targets
The ranges above give you safe zones. This section provides specific targets and transition protocols for maximum yield.
Weeks 1-3 (Seedling / Establishment): Start at EC 0.5 with half-strength nutrients once the first true leaf appears. A standard herb nutrient recipe at this stage: N 125 ppm, P 39 ppm, K 162 ppm, Ca 176 ppm, Mg 60 ppm. Increase EC by 0.2 mS/cm per week until transplant.
Weeks 3-4 (Post-Transplant): Hold at EC 1.0 for 3-5 days after moving seedlings to the main system. Roots need time to adjust. Resume ramping once new growth appears.
Weeks 4+ (Full Vegetative): Target EC 1.2-1.6 with N 175 ppm, P 50 ppm, K 205 ppm, Ca 176 ppm, Mg 60 ppm, S 70 ppm. This is the formula for the rest of the plant's life. Replace the reservoir completely every 1-2 weeks to prevent nutrient imbalances.
Nutrient Solution Management Tips
- pH drift is common during rapid growth. Vigorous nitrogen uptake causes pH to rise. Check and adjust daily. See our pH crash guide for troubleshooting.
- Water temperature matters. Keep nutrient solution at 20-24 C (68-75 F). Above 26 C, dissolved oxygen drops and Pythium risk increases.
- Never exceed EC 2.0 for basil. Unlike fruiting crops, basil yield actually decreases at high EC. A 2022 study found peak quality at EC 1.2-1.6.
- Top-up between changes. Between full reservoir changes, top up evaporating water with plain pH-adjusted water (not nutrient solution) to prevent EC creep.
Lighting for Indoor Hydroponic Basil
Basil is a high-light herb that responds strongly to daily light integral (DLI). Unlike lavender, which tolerates lower light, basil rewards every photon you give it.
Light Targets
| Parameter | Seedling | Vegetative (production) |
|---|---|---|
| DLI (mol/m2/day) | 6-10 | 12-20 |
| PPFD (umol/m2/s) | 150-200 | 200-300 |
| Photoperiod | 14-16 hours | 16-18 hours |
Walters et al. (2023) modeled basil's DLI response and found optimal fresh mass at 11.8-13.2 mol/m2/day, with yield increasing linearly up to approximately 17-20 mol/m2/day. A DLI of 12.9 mol/m2/day balances yield with energy costs for commercial production. Extended 18-hour photoperiods improved yield after harvest cuts.
LED Spectrum
Full-spectrum white LEDs work well for basil, but research shows specific wavelengths offer meaningful advantages:
- Red light (660 nm) drives the highest photosynthetic rates at 11.2 umol CO2/m2/s.
- Blue light (450 nm) is particularly valuable: just 45 minutes of exposure at 500 umol/m2/s increases phenolic content by 25% and flavonoid content by 85%. Blue light also prevents excessive stem elongation.
- Far-red light as an end-of-day or pre-harvest treatment increases dry matter content of leaves and stems.
Jokic et al. (2025) determined basil's light saturation point at 1,500 umol/m2/s, though practical indoor cultivation at 200-300 umol/m2/s produces excellent results.
Practical Setup
For a small basil setup (2-4 plants), a 100-150W full-spectrum LED panel positioned 25-35 cm above the canopy delivers approximately 200-300 PPFD. Set a timer for 16 hours on, 8 hours off. Basil benefits from a dark period for proper hormone regulation and starch metabolism. Raise the light as plants grow -- basil can reach 30-70 cm tall.
Temperature and Humidity
Basil is a warm-season herb that grows fastest at temperatures above what lettuce or most other herbs prefer.
Temperature Targets
| Parameter | Target | Notes |
|---|---|---|
| Day temperature | 22-28 C (72-82 F) | Optimal growth and oil production |
| Optimal | 26 C (79 F) | Peak vegetative growth |
| Night temperature | 18-22 C (65-72 F) | Slight drop is beneficial |
| Minimum (growth stops) | 10 C (50 F) | Below 18 C, growth slows significantly |
| Maximum (stress begins) | 35 C (95 F) | Fresh mass can increase up to 35 C under high light |
| Germination optimal | 25-30 C (77-86 F) | Below 20 C germination becomes unreliable |
| Nutrient solution | 20-24 C (68-75 F) | Above 26 C increases root rot risk |
Walters et al. (2023) found that basil fresh mass increased 3-fold as mean daily temperature rose from 23 C to 35.7 C under moderate light. However, temperatures above 32 C reduce essential oil quality and increase bolting risk.
Humidity and Airflow
| Parameter | Target | Notes |
|---|---|---|
| Relative humidity | 50-70% | Optimal range for growth |
| Optimal humidity | 60-65% | Balance of growth and disease prevention |
| Maximum nighttime RH | 80% | Above 85% enables downy mildew sporulation |
| Minimum canopy airflow | 0.3-0.6 m/s | Prevents fungal boundary layer |
The critical humidity threshold is 85% at night. Cohen and Rubin (2015) established that downy mildew sporulation begins at sustained RH above 85%, with full sporulation cycles requiring more than 7.5 hours at >95% RH during darkness. Nighttime fan operation reduced disease severity by up to 72.5%. Use oscillating fans to maintain 0.5-0.6 m/s airflow across the canopy -- this is your single most effective disease prevention tool.
Pruning and Harvesting
Regular pruning is what separates a productive basil plant from a leggy, flowering one. Each time you pinch a stem above a node, that node produces two new branches -- effectively doubling your productive stems with every cut.
Begin harvesting once the plant has at least 3 sets of true leaves (15-20 cm tall). Cut stems just above a leaf node, taking the upper 5-7 cm of stem tips. Never remove more than one-third of the plant at once. Harvest every 7-10 days during active growth.
Pinch flower buds immediately when they appear. Flowering redirects the plant's energy from leaf production to seed formation, and leaf flavour declines after bloom.
Research on successive harvests found that the second cut produced a modest yield reduction of approximately 20%, with nitrate content in leaves increasing by 48%. This is normal -- the plant compensates with more branching points, and total yield over the plant's lifetime increases with regular harvesting.
For the complete harvesting technique with step-by-step photos, see How to Harvest Basil Without Killing It.
Common Hydroponic Basil Problems
Basil Downy Mildew (Peronospora belbahrii)
The most destructive basil disease worldwide. Symptoms: yellowing between leaf veins (resembles nutrient deficiency), followed by purplish-gray fuzzy sporulation on leaf undersides -- most visible in early morning.
Prevention is everything. Omer et al. (2021) found that reducing plant density to 14-15 plants/m2 decreased severity by 32-68%, and nighttime fanning reduced severity by up to 72.5%. Keep nighttime humidity below 80%, maintain good airflow, and grow resistant varieties (Prospera, Obsession, Devotion).
If it appears: Remove infected leaves on a sunny day (UV kills spores). Improve ventilation. Organic treatments include potassium bicarbonate and Bacillus-based biofungicides.
Fusarium Wilt (Fusarium oxysporum f. sp. basilici)
Plants grow normally until 20-30 cm tall, then suddenly wilt with brown stem streaking and vascular discoloration. No cure exists -- remove and destroy infected plants immediately. Disinfect everything.
Prevention: Grow resistant varieties (Prospera, Nufar, Obsession). Use pathogen-free seed. Sterilize all containers and tools between crops.
Root Rot (Pythium spp.)
Brown, slimy roots with a foul smell. Wilting despite adequate moisture. The most common root disease in hydroponic basil.
Prevention: Maintain dissolved oxygen above 6 ppm (ideally 8-9 ppm). Keep nutrient solution at 20-24 C. Use air pumps continuously in DWC. Block light from reservoirs. See our root rot guide for detailed treatment protocols.
Advanced Disease and Pest Management
Aphids and Whiteflies
The most common pests on hydroponic basil. Aphids cluster on leaf undersides and growing tips, producing sticky honeydew and causing leaf curling. Whiteflies flutter up when plants are disturbed.
Treatment: Insecticidal soap spray applied to leaf undersides. Neem oil for persistent infestations. Yellow sticky traps for monitoring. Biological controls: ladybugs, lacewings, Aphidius colemani (parasitic wasps for aphids), Encarsia formosa (parasitic wasps for whiteflies).
Prevention: Inspect all new plants. Fine mesh screens on vents. Avoid excessive nitrogen -- lush, soft growth attracts sap-feeding insects.
Gray Mold (Botrytis cinerea)
Gray fuzzy mold on leaves and stems, especially after pruning cuts. Favoured by high humidity and poor airflow.
Treatment: Remove infected material immediately. Reduce humidity and improve air circulation. Potassium bicarbonate fungicides.
Prevention: Always prune in the morning so cut surfaces dry before nightfall. Maintain humidity below 70%. Space plants adequately.
Bacterial Leaf Spot (Pseudomonas cichorii)
Dark, water-soaked spots on leaves that can coalesce and cause defoliation.
Treatment: Remove infected material. Reduce humidity. Sterilize tools between plants.
Diagnostic Leaf Symptom Guide
| Symptom | Likely Cause | First Action |
|---|---|---|
| Yellowing between veins, older leaves | Magnesium deficiency | Add Epsom salts; check Mg 40-70 ppm |
| Yellowing between veins, younger leaves | Iron deficiency | Check pH (likely too high); add chelated Fe |
| Purple-gray fuzz on leaf undersides | Downy mildew | Remove leaves; improve airflow; check variety |
| Brown vascular streaking, sudden wilt | Fusarium wilt | Remove plant; disinfect system |
| Brown slimy roots, foul smell | Pythium root rot | Lower solution temp; increase aeration |
| Sticky honeydew, curled leaves | Aphids | Insecticidal soap; release beneficials |
| White-winged insects on leaf undersides | Whiteflies | Yellow sticky traps; insecticidal soap |
| Gray fuzzy mold on stems after pruning | Botrytis | Remove; reduce humidity; prune in morning |
| Leaf edges browning/crispy | EC too high (nutrient burn) | Flush system; reduce EC below 1.6 |
Expected Yield and Timeline
| Growth Stage | Duration | What to Expect |
|---|---|---|
| Germination | 5-14 days | Sprouts fastest at 25-30 C in rockwool or coco plugs |
| Seedling | 2-3 weeks | First true leaves; begin half-strength nutrients |
| Transplant | At 2-3 true leaf sets | Move to hydroponic system; start full nutrients |
| First harvest | 3-4 weeks after transplant | Plant reaches 15-20 cm with 3+ leaf sets |
| Continuous harvest | Every 7-10 days | Pinch stems; each cut doubles branch points |
| Total seed to first harvest | ~50 days | ~30 days from cutting |
Yield Benchmarks
| System | Fresh Weight per Plant (7 weeks) | Source |
|---|---|---|
| Aeroponics | 438.6 g | Khater et al. (2021) |
| DWC | 229.3 g | Khater et al. (2021) |
| Drip / Substrate | 188.0 g | Khater et al. (2021) |
| Lifetime yield (all systems) | ~500 g / 0.5 kg | Multiple sources |
| Per m2 (dense planting) | 2-3 kg | Production average |
A single well-maintained hydroponic basil plant can produce continuously for 3-6 months before quality declines and it's best to start fresh from seed or cuttings.
Getting Started: Your First Hydroponic Basil
If this is your first hydroponic herb, basil is the perfect starting point:
- Choose DWC or Kratky. A 5-gallon DWC bucket with an air pump and air stone (total cost: $20-40) is the easiest high-performance option. For zero maintenance, try a Kratky mason jar -- just a jar, net pot, clay pebbles, and nutrient solution.
- Pick Prospera DMR. Disease-resistant, classic Genovese flavour, widely available. If you can't find Prospera, Nufar is a good alternative with Fusarium resistance.
- Start seeds at 25-27 C. Sow 2-3 seeds per rockwool cube. Mist daily. Thin to the strongest seedling after germination.
- Provide 16 hours of light. A 100-150W LED panel at 25-35 cm above the plants is ideal. A bright south-facing window works too, but expect slower growth and leggier plants.
- Use a pre-mixed hydroponic nutrient. A two-part (A + B) herb or leafy green formula works perfectly. Start at EC 0.5-1.0 for seedlings, ramp to 1.0-1.6 for mature plants.
- Get a pH/EC meter. Check every 2-3 days. Maintain pH 5.5-6.5 and EC within the ranges above. This is the single most impactful investment for consistent results.
- Pinch early, pinch often. Once the plant has 3 sets of leaves, cut the main stem above a node. Each cut produces two new branches. Repeat every 7-10 days.
- Keep air moving. A small fan pointed at (not directly on) your plants prevents downy mildew and strengthens stems. This matters more than any fungicide.
For precise nutrient parameters as you scale up, the Truleaf basil page provides stage-specific data you can dial into any system. If you're expanding your herb garden, hydroponic mint and hydroponic lavender are natural next steps using the same system.